Showing posts with label trousers. Show all posts

Sunday, March 3, 2019

Lander Pants

Whew! We're just coming off a rush of travel and house guests. All very fun, but it's cut into my sewing and blogging time. So, better late than never, here are some pictures from the Make the Lander Pants class that I took back in February with my friend, Jessica.

The finished Lander Pants
The class took place at Hello Stitch sewing studio in Berkeley, CA., We had a blast.


I should have taken more photos, but the day was such a blur of activity that I didn't think of it until we were heading out in the evening.


The studio space is large and light and there are plenty of tables and equipment and space. The class was capped at 7 people (if I remember right), so we all got a fair share of our teacher's time. That teacher was Beth Gavin, who blogs at SunnyGal Studio. She kept us on point. Pretty much everyone walked out with a close-to-complete pair of pants, even though some of us were changing up the construction by subbing zip flys for the buttons and slash pockets for the patches. It's fun to see a bunch of different people sewing up the same pattern. Gives you great ideas for next time.

Since we were making a 70 mile drive to attend the class, we decided to treat ourselves to a Girl's Night Out in Berkeley. We stayed at a very cute AirBnB just a mile from the class location. Too bad the weather was rainy, or we would have taken advantage of the garden table to sip our morning coffee.

Cute garden
Cute living room with french doors
All in all a very fun get away. There's nothing like social sewing.

So, on to the pants. I've been a bit smitten with this pattern ever since it first came out. It's totally got the zeitgeist of the pants of my youth. Which, I admit, was in the 70's. We used to buy those pants at the Army Navy Surplus store on University Avenue in Berkeley. They came in blue denim and railroad denim. Gee, I loved those pants. And, thanks to the wonders of sewing, I can wear them once again!

Side view
I used Santa Cruz Twill from Hart's. The pattern called for almost 3 yards. Since I'm a short person, I think I have enough left for a skirt.

Back view. I think I had more butt in the 70's
I made the full-on button-front fly and patch pocket version and I like them a lot. They're comfortable  to wear and straightforward to sew. I also love the pockets.


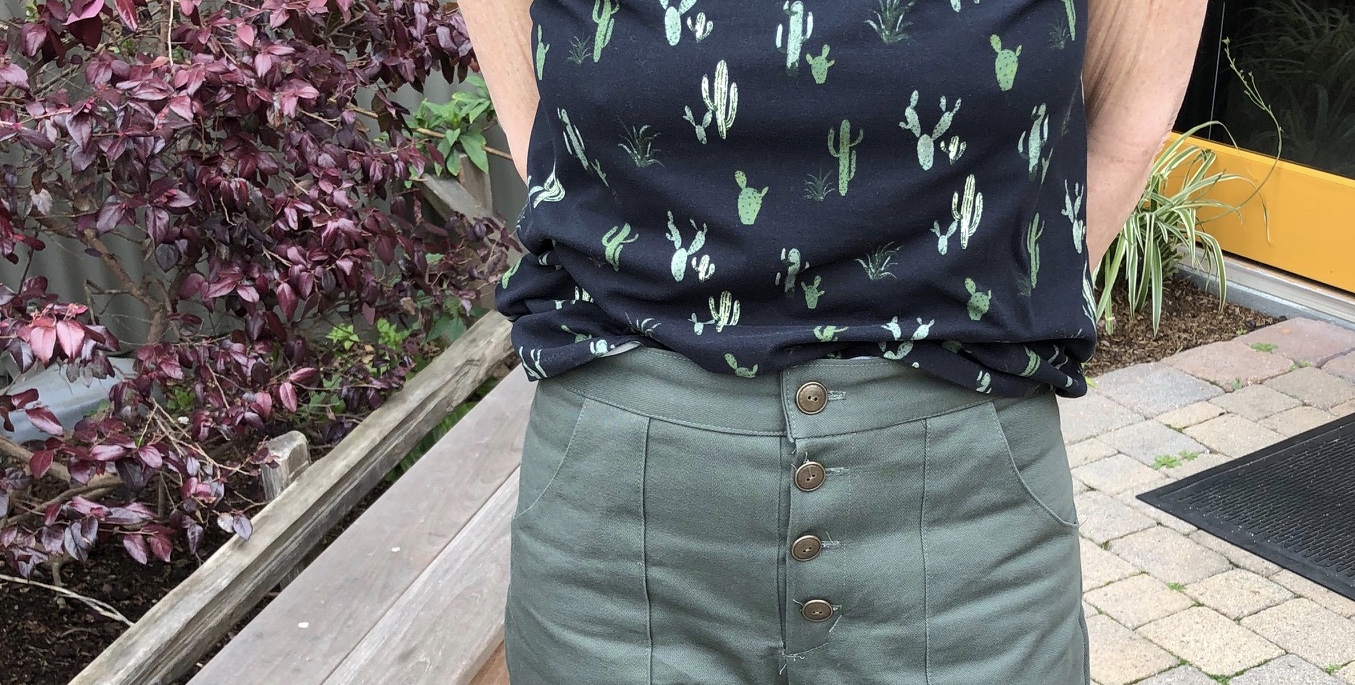
Here's a button fly closeup. The top is a Kirsten Kimono Tee made from cactus fabric that turns out to be a good color match for these pants.

The only change I'll make next time is to swap out the straight waistband for a curved one. The straight band gapes a bit on me, even though I am pretty darn straight myself.

I've already bought some railroad stripe denim to make myself another pair of these pants. Now all I need to relive my high school days is a chambray work shirt and some hiking boots.

My pattern review is on PatternReview.com here.

Monday, December 11, 2017

Button Front Fly

I made these pants partly for scientific purposes. I've never sewn a button front fly before. Actually, I haven't worn a button front fly since my old shrink-to-fit Levi 501s in high school. This pattern is in the December, 2017 issue of Burdastyle. Even though you can't see the buttons in either of the photos of the pants, I was intrigued.

Front view
I had my doubts while sewing, and I had to stretch my visual thinking to figure out how to put that danged fly together. Now that they're done, I like 'em!

Here's the line drawing from Burdastyle. They show them with a cropped leg and a flounce at the ankle.

Burdastyle December, 2017 #101
As a woman in her 60s, I feel I need to be sparing in my use of flounce so I decided to omit those. And as a short person, I think cropped trousers make me look even stumpier, so I lengthened them 6 inches. I'm 5'3";  if you're a long-legged gal and you want ankle length you may want to tack on even more.
Side view
I planned to add pockets, which Burdastyle doesn't include. I dug up an inseam pocket from another pants pattern; cut them out and everything. Then I decided I couldn't be bothered after all. Next time, I'll go for it though.

The fabric is a lightweight railroad strip denim that I got at Cool Cottons in Portland a couple years ago. Once I got it home the fabric seemed a little too heavy for a top and a little too light for a pair of pants. I think it works OK for this style though.


I'm actually surprised how well I like these pants. I test wore them to a party yesterday and they felt very comfortable. Add some pockets and this could become a go-to pants pattern for me.

My pattern review is on PatternReview.com here.

Happy echeveria

And here's a happy, somewhat seasonally colored echeveria in my planter on the porch. Succulents seem to really like this planter. This guy looks like he's going to bust out the sides and take over the yard.

Sunday, May 31, 2015

May Burda Challenge - Fifties Love Affair

Just under the wire, here is my May garment for the Burdastyle Challenge.

The May, 2015 issue didn't have anything that really grabbed me, so I went on a very enjoyable voyage through the Mays of the past. I settled on these trousers, from the Fifties Love Affair section of the 2011 issue.

Burdastyle 05-2011 #124
The magazine shows the model lounging against a cream colored Jaguar convertible (which The Man believes to be an XKE). She's wearing the trousers with a pleat-neck top and carrying a wee Luis Vitton bag. Very Audrey Hepburn. They describe the trousers as "tapered 3/4 length classic trousers/pants with low-set broad waistband and deep pleats."


I am 5'2" (and three quarters) and I have what I like to think of as "athletic" calves. I don't do cropped trousers. I thought I could figure out how to lengthen them though, and in stash I had some charcoal twill with a bit of lycra that seemed like it might work well.

Inspired and eager, I hopped up to the cutting room (a.k.a. the carpet in the guest bedroom), laid out my tools and stared intently at the pattern sheet until I thought I had my three pieces spotted. I went to roll out my tracing paper, and then disaster struck. I was out. Drat!!

I use medical exam paper for my pattern tracing. Apparently I'm so used to that paper that I can no longer use anything else. I placed an emergency order with Amazon, paid for expedited shipping and twiddled my thumbs for 11 days. Finally, last Tuesday my package arrived and I got to work.

I lengthened the pants about 4 inches. I thought that would allow plenty of room for error, but it turned out to be just enough.

I moved the zipper from the side to the back because I couldn't wrap my brain around how to install a side zip into an inseam pocket, and I was pretty sure that Burda was not going to give me much help. In fact, I was barely able to stumble through the pocket instructions at all.

When I do an in-seam pocket, I normally sew the pocket pieces to the sides of the garment front and back and then seam the front and back together all in one go. Burda had me sew the side seams on the pants, but leave the pocket slit open. Then you attach the pocket pieces to the garment front and back, sew the edges of the pockets closed and press to the whole schmear to the front.

It took me two hours to figure out pocket #1, and then I proceeded to do pocket #2 wrong.  Twice.

The fit doesn't look this bad if I don't have my hands in my pockets, hones.
I also changed the waistband to have a button. Burda had the zipper going all the way to the top of the waistband. I kind of like my waistband to be a bit more adjustable. Cake and all.

I haven't really test-worn them yet, but I think I like them. Even though there are pleats in the front, the fit isn't baggy, so they're different from my enormous pleated 80's pants.

Roomy 80's pants
My only complaint is that the pockets can gape open a bit. I wouldn't mind so much, but I made the pockets out of contrasting fabric, so there's a flash of blue when I move. I may end up sewing those pockets closed, which would really chap my hide, considering how much brain-sweat went into installing the darned things.

 See that small flash of blue there?
I should have made the smaller pocket piece out of the pants fabric, then all would be well. Next time....

My pattern review is on SewingPatternReview.com here.

Saturday, January 18, 2014

My First Fly Front

I'm participating in the Make a Garment a Month challenge and the theme for January is to learn a new skill. I figured it was time to dive deep into the ocean of my sewing fears and try a fly front.
My first fly front!
Kristy of Lower Your Presser Foot has made up a Burdastyle trouser pattern that I'd been eyeing. They looked so great on her, I decided to give it a whirl. With this style of trouser, my cowardly method of moving the zip to another location wouldn't cut the mustard. Time to gird my loins and get to it.

I used some stretch twill in a nice greenish-gray that I got at Britex last time we were in San Francisco. Lesson #1 - don't buy fabric for trousers unless you've checked how much yardage you're going to need. I thought 1.5 yards of 54" fabric should be fine. I'm only 5'2" for gosh sakes. Turns out it takes more fabric than you might think to wrap all the way around your legs. I had to get extremely creative with my cutting layout, including having the front pieces cut North to South and the back pieces cut South to North. When I got done I could stash my leftover fabric scraps in an egg cup.

I figured out pretty quickly that using Burdastyle instructions to insert your first fly front was a bad idea. I read those instructions 15 times and was still at a loss. 

Boy am I glad I live in the information age. I scoured the internet for information on fly fronts and found a Threads tutorial by Sandra Betzina that I actually thought I understood. Sadly, her pattern was using cut-on fly facings. I had already cut my pieces according to the Burdastyle pattern, which has separate fly facings. And no way could I re-cut anything. I manhandled my pattern pieces into a construct that more or less let me follow along with Sandra and ended up with something that works, and doesn't look too bad from the outside. The inside's a different story. Looks like one side of the zip attacked the other and ripped its guts out.

This is the good side. The bad side is too terrifying to show to the public.

front  

back

side - the top is one of my 700 Renfrews

Love those pockets
The trousers actually turned out pretty much as I hoped they would. It is so great having fellow sewists who act as pattern testers for me. I was looking for something a little slimmer-cut than my last few pairs of pants. I wanted them to be kind of like a nice, comfy pair of weekend jeans. Only I'm not ready yet to sew a pair of jeans. Maybe for 'Face Your Fears 2015.'

I have another piece of stretch twill that's earmarked for my second try at these. I can tell you one thing for sure though, I'll be altering that pattern to use a cut-on fly!

I should be able to do that by just lining up the seam lines for the fly pattern pieces with the seam lines for the center front pattern pieces, right?

My pattern review is on PatternReview.com here.