Showing posts with label sewing. Show all posts

Wednesday, April 27, 2016

Rice Heating Pad

I've been slowing down on the sewing front lately, feeling creatively blocked. I blame it on my speed-reading of The Life-Changing Magic of Tidying Up. Under its influence I went through my dresser drawers and closet to prune and organize my wardrobe. I must admit that I have plenty of clothes. Plenty. Still, sewing is my hobby, dash it all! I may slow down, but I'll never stop.

So here's my one FO of the last month:

Rice heating pad
It's a heating pad filled with rice. And yes, that's bandaid fabric.

Flexible little minx
I made this for The Boy. He has done Brazilian Ju-Jitsu (a.k.a. BJJ, here's his school) pretty seriously since he was in junior high school. It's a good workout, but it can be kind of hard on your body. I remember one of his first instructors saying that ju jitsu is like weight lifting, but the weight that you're lifting is another guy. The Boy has entered his third decade, so there are times when the muscles can use a little soothing.

This is a quick little project, perfect for the odd piece of stash, and it makes a nice gift. You just sew up a rectangular bag of your preferred size, sew a few channels to corral the stuffing, fill each channel  about two-thirds of the way with rice and then sew across the top to keep the filling from escaping. Here's a visual, in case that helps.

My first tutorial!
I use rice for the filling because it has a nice weight but stays pretty flexible. My Aunt, Sister Ronan, has a version filled with corn. That also works well, but you really want popcorn* when you smell it heating up. Basmati rice has a nice, nutty scent. Sometimes I throw in a handful of lavender flowers for a little aromatherapy punch.

When you want a little warm-up, just pop the bag in the microwave (I do 90 seconds on high, then rotate and do another 90 seconds) and then apply to the muscles that need it. Or just cuddle with it in bed on a chilly night.

The Boy demonstrating proper application
If you want a cold compress, you can stash the bag (inside a plastic bag) in the freezer for 20 minutes. 

Also good for tired necks. A recliner is also helpful.
We have one of these rice bags that we've been using for at least 10 years and it's still going strong. I think every home can use one!

* Actual pop corn is not recommended for filling, unless you plan to eat after one use.

Monday, March 14, 2016

Sewing Camp

I spent last weekend at Happy Valley Conference Center, sewing up a storm in the company of about 50 other ladies. Speaking of storms, an El Nino fueled event lumbered through the area while we were there, keeping us inside and productive. That's why I'm not posting endless pictures of the glorious redwoods and the spring flowers

The event was organized by a nifty lady named Jen Namba. A long weekend in the redwoods with good food, good company and lots of space to let your creativity flow. What could be better?

The event was a happy mix of crafters. Most folks were scrap bookers; a new world to me. Holy cow, do they ever have a plethora of fascinating materials and tools!

I was in the Quilting Room. My friend Jessica and I were the only garment makers in attendance that weekend. The rest of the crew were quilters, busily making amazing things.


Besides a well-stocked snack table and a constant supply of coffee, tea and hot cocoa, the Quilt Room offered a communal cutting table, a bunch of large cutting mats, rulers and rotary cutters and three irons with large pressing boards. I'm used to doing my cutting out while crawling around the floor in the spare bedroom, so this felt like quite a luxury. Each person also got their own 6-foot table to set out your sewing machine, serger or what-have-you.

Large cutting table! Snack table in the background.
I began the weekend by producing a wadder of a Watson bra (a.k.a. the Wadson or the Bra-dder). I had sized up, which looks like it was a bad idea. Plus, I was a bit too laissez faire in my cutting out. Little inaccuracies add up to big trouble in the world of bra making. The Man gave me a pep talk afterwards, though, so I'm not giving up on lingerie yet.

Incidentally, I had been feeling pretty good about my improving accuracy in prepping my sewing projects. Let me tell you, there's nothing like spending a weekend with some top-notch quilters to teach you what accuracy really means. Those guys are phenomenal. Look at this beautifully pieced quilt top:


Oh, and by the way, it's smaller than a piece of letter-sized paper:


All done on the cutest little Featherweight you could imagine:


And look at this baby quilt:


I told the maker she should finish it with the back side showing so the public could admire all her perfectly matched and pressed little seams.

I recouped from my Wadson by finishing a wool jacket and a woven tee, both to be reviewed soon. Here's the jacket collar getting rolled. See the quilt on the board in the background?

Jacket collar being rolled
Here's another shot at the end of the weekend. Jacket finished and quilt top zooming right along.


Jessica finished three tee shirts, a Marcy Tilton jacket and a pair of knit pants. Not to mention piecing her first ever quilt top!


Yes, Jessica got sucked into the quilting vortex. Well, me too. We saw some gorgeous stuff this weekend. We're planning on attending the next meeting of the South Bay Area Modern Quilt Guild.

And! We sucked our Quilt Room Leader into garment sewing! Here's Karen (a.k.a. Capitola Quilter) in her brand new Renfrew, which she made from start to finish on our last day.


This is THE most accurately cut and constructed tee shirt of all time. The quality work shows in the fit, right?

If you're in the Santa Cruz area, do yourself a favor and check these events out. It's a totally good time!

Tuesday, March 3, 2015

To Pullayup and Back

I just got back from my most exciting sewing trip ever. My sewing bud, Jessica, and I went north to the 2015 Sewing and Stitchery Expo in Pullayup, Washington.

And we went by train.
Amtrak train 1131 pulling into the station
We had a romette with two beds and our very own bathroom.


It's about a 22 hour trip from San Jose, CA to Tacoma, WA and we enjoyed every minute. Besides the gorgeous scenery passing by out our window, we got in some quality knitting time.


The Steel Bridge in Portland. I love Portland. We had time on the way up to walk about a bit and grab a coffee.
 I went a little crazy with the seminars. I think I signed up for 15. Some were better than others, but I learned something from every one.

Most creative vest


Here we are in the thick of it!
There were a bunch of fun booths in the marketplace. We did some cruising every day, in between our classes.

As a Stashbusting Sewalong participant, I tried to keep my credit card in my wallet. But I failed.
Stretch elastics for lingerie making

Marking tools, new shears, a measuring tape and a nice jacket pattern

These are the fabrics I don't feel too guilty about, because I don't have an assortment in stash. The two khaki pieces are stretch twills: one will be the Jalie jeans pattern I've been itching to try and the other will be another pair of BurdaStyle 10-2013-127. The berry piece is rainwear - I want to make a Minoru for wet days. That's if we ever have another wet day here on the Central Coast. Our drought is becoming the new normal.

The two pieces on the right are slated for shirts: the dotted green is a cotton gauze and the black is polyester with a nice, heavy drape. Maybe an Archer?

The roll up top is a light weight wool. I think I have enough for the McCall's 6709 pictured up above.


Here's the group I should feel guilty about. Knits. I have a whole shelf of knits in the fabric closet. But this is a bundle of coordinating fabrics from Marcy Tilton's booth. I've been wanting to try some pattern/print mixing, and using a pre-picked palette will be a good entree for a nervous Nellie.

One of the good things about the train is you can bring a honking big suitcase!


Thursday, August 14, 2014

Winner Winner, New Dress for Dinner

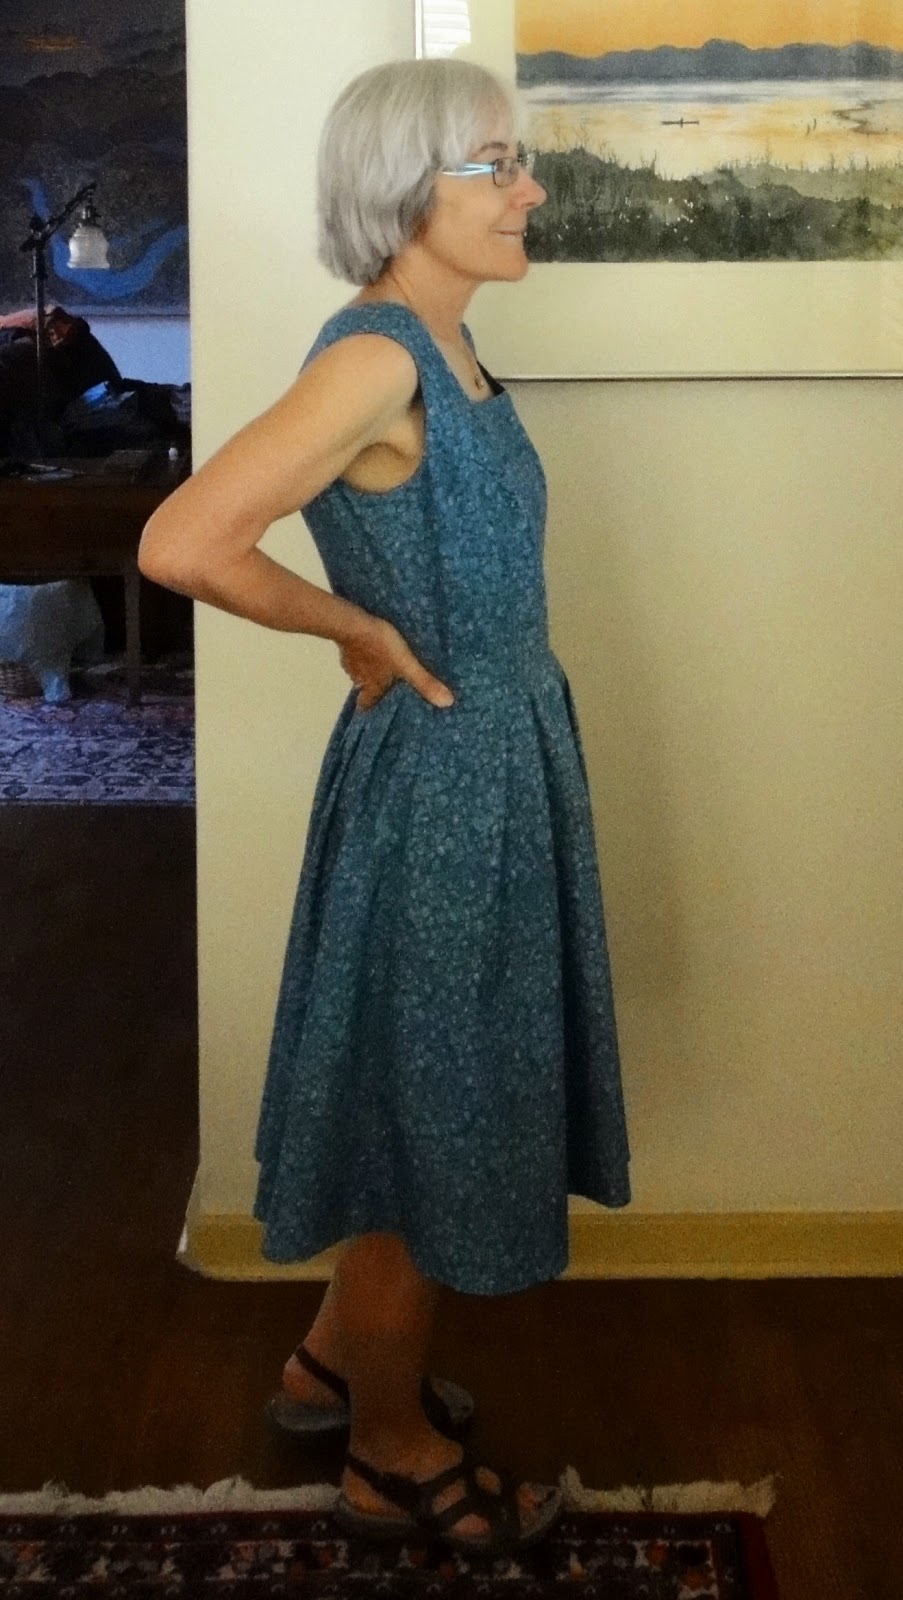
Graca, who blogs at Sew Essentially Sew, has been running a series of great pattern giveaways, and I was the lucky winner of McCalls 8133!

It even has a square-neck version!
When I saw this pattern offered up on her blog I was struck with a vision of myself wearing the sleeveless, square-neck View B with a broad-brimmed sun hat while sipping a chilled chardonnay on the veranda of the Ashland Springs Hotel, where I will be staying next week.

My voyage was a bit hit-or-miss, but I think I got there in the end!

Lately I've been sewing mainly from my BurdaStyle magazines, because I have a stack 4 feet high and I've figured out how their sizing fits me. I knew I'd have to play around with this pattern to figure out the fit and I knew from my tireless sewing research (a.k.a. reading my favorite blogs) that McCall's probably built in more ease than I'm used to with BurdaStyle.

If I take a deep breath I'm a 36" bust. That would put me in McCall's size 14 which, the pattern envelope advised me, would result in a garment with a finished bust measurement of 42 inches. Too much for my taste. So I started with the size 10, designed for a 32.5 inch bust. And a 25 inch waist. Ha! Not a chance.  But how to tell if they'd designed for 6 inches of waist ease too?

The bodice has lovely princess seams in front and two darts in back. I measured the flat pattern pieces at the waist and tried to do the math, remembering (on try #2) to subtract for the darts and all those seam allowances. Dang, that's a pain to do in inches. This is why the rest of the civilized world went metric. After running through a few pages of figures and failing to come up with the same answer twice, I just cut the straight size 10, thinking I could always take a smaller seam allowance at the waist.

I like the back - feels very summery.
Actually, it came up fitting pretty darn well; even a bit loose. This way I can have some brie and baguette with that chardonnay and still sit comfortably for Two Gentlemen of Verona.


I used some cotton from the stash that I got on sale at a local quilting store. I liked the colors and it was cheap enough that I thought I could use it for muslins. There was enough to give this dress a go, but only just. The skirt on this little number is pretty full.

Once I saw the fabric and the pattern together, I really liked the combo. Which is why it was doubly sad that I spaced out and cut the wrong facing pieces. Doh. Fiddled around for a while to see if I could re-cut, but no dice. Not enough fabric, even if I cut with the grain all catty-wumpus.

Here's my hidden silver lining: there was a time when I would have collapsed into despair at this point, after casting the partly-constructed dress into the back of the upstairs closet. Now that I have a little more sewing experience under my belt, I thought of three ways I could salvage my summer sundress dreams.
  1. I could make the version with sleeves instead. Oddly, there was enough fabric left to squeeze out the sleeves. I was wedded to the sleeveless vision though, so I rejected option 1.
  2. I could use bias binding instead of facings to finish the sleeves. But the sleeveless view had an all-in-one facing that I really liked and I feared the neck facing would be impossible to tame if it weren't incorporated with the sleeve facings. So I rejected option 2 as well.
  3. I could just cut the facings out of some other fabric. After all, if I do my job well the facings should be invisible, right? Right! So I went with option 3.

OK, so they're not totally invisible, but close enough for government work!

A million thanks, Graca! I'll be toasting you from the veranda on Tuesday night!

My review is on PatternReview.com here.


Friday, March 7, 2014

A Fair Wind with Fehr Trade

When I was considering taking the RTW Pledge the garments I thought would give me the most challenge were running gear. I've made the odd pair of shorts, but I had no idea how to make a running top that was actually functional. Just as I was wavering, Melissa released this pattern. Problem solved!

I did the Y back for my first version
I finished my first make of the Fehr Trade XYT Runnning Top last Sunday. The designer, Melissa Fehr, is a runner herself. The kind who runs marathons. The kind who makes a 10k look like child's play. I figured if there was anyone who could produce a pattern for a running top that would be comfortable, supportive, and wouldn't rub you the wrong way, she would be that gal. Sure enough, she is.

Front view
I hate buying running tops. They're rediculously expensive and I have a hard time finding something that I like. I prefer a bra that's all one stretchy piece - just pull it on over my head and go. What I see in the stores lately is much more structured. They have a bunch of underwires and buckles and winches that someone of my size just doesn't need. I figure the more doodads they include, the more likely I am to have chafing.

The XYT is just my preferred style. The cut is simple and the built-in bra is all stretch and no hardware. Melissa has you use two layers of power mesh, each layer rotated 90 degrees to equalize the squeeze.

The directions are super-clear. I discovered I need to work on my stretch-and-sew skills, but practice will make perfect and even my first creation is totally wearable. I don't have one of those fancy-dancy sergers, but I could do everything I needed for this pattern on a sewing machine with a zig-zag stitch.

Lime green picot elastic
Due to my math-challenged brain, I bought the wrong width of elastic for the neck and armholes. Note to self: 3/8 of an inch is less then 1/4 of an inch, not almost 1/2 inch. I did some stash-diving and found some 3/8 inch elastic in lime green with a little ruffle on the edge. Melissa's directions have you turn the elastic as you finish the edges to it's totally encased and there's no chance of rubbing. I decided I liked the hint of lime enough to try leaving it exposed. So far, no problem.

I took the top out for it's maiden voyage the morning after I finished it and it worked great! I have to wriggle around a bit to get into it, but once I'm there it's comfortable and I feel like I have plenty of support. I gather from cruising the interwebs that even ladies with more cargo than I can use this top for running with no issues.

I love the cute style of my top, but I think the next one I make I'll try a small pattern hack. I like to limit my sun exposure because of the whole skin cancer thing. I think I'll try just shortening the outer layer to make a running bra that I can wear under a long-sleeve top even on a warm day. That way I can run myself silly and not worry about what's happening with my melanin.

Here's my review on PatternReview.com

Tuesday, February 4, 2014

Sewing a Suitcase

I spent the last two Sunday afternoons taking a suitcase sewing class at Hart's Fabric here in Santa Cruz. Besides selling a great selection of fabric, notions, and sewing machines, Hart's offers some really fun classes. Our class used the Weekender Travel Bag pattern by Amy Butler.

Amy Butler Weekender Bag
Why sew a suitcase, you may ask? After all, paper bags have worked just fine for me for the last 15 years. I was asking myself that same question as I was crawling around on the floor cutting out the 46 pattern pieces required for this project. Forty. Six. That's without optional interior pockets or bias strips for piping. It felt like one heck of a lot of pattern pieces.

I added two interior pockets to supplement the 4 exterior pockets. What can I say? I like pockets.
OK, technically the pattern has 7 pieces (3 of which you draft yourself). But some of them you cut out 10 times, so it all adds up.

There were 4 students, including yours truly and my best sewing buddy, Jessica. Katrina was our ever-patient and capable teacher. Some of the class had never inserted a zipper before. One student was a total bag pro with her own business on Etsy. Somehow Katrina kept us all moving along together, and I think each of us had fun and felt like we learned something new.

Diligent students hard at work
Adding a nifty secret interior pocket with zipper
So why not just follow the pattern on my own rather than take a class? I mean, besides the fun of spending a couple of afternoons sewing with 4 creative and very entertaining ladies?
  1. While I probably could have figured out the pattern instructions myself, with careful reading and many cups of coffee, it was really great to have Katrina walking us through construction. This sucker is one of the more complicated things I've ever sewn.
  2. Technique: it's not just what you do, it's how you do it. While the individual steps of the instructions more or less made sense, there were times when I was sewing through so many layers of peltex, interfacing and home dec fabric that I could barely force the bag under my presser foot. By the end of the second evening sewing I felt like I'd been wrestling an angry anaconda. I probably should have clubbed the sucker before trying to jam it through my feed dogs. There were a few moments there when, if left alone, I would have given up. But Katrina petted my head and told me it would all be OK. And she was right! By the end of the evening, I had what actually looked like a suitcase, plus I have the experience to tackle another project like this in the future.
  3. It was fascinating to see what fabrics the other students had chosen and how much difference that made in the look of the finished bag. From Mod to Zen we had everything covered, and all of the combinations were dy-no-mite.
  4. Katrina got me to think about a lot of out-of-the-pattern-box options I wouldn't otherwise have been bright enough to consider. Internal pockets. Little feet on the bottom of the bag to protect it from dirty floors and wet sidewalks. D-rings to allow you to snap on a shoulder strap when you want to. Using contrasting fabric for exterior pockets. A pop of color for piping. Oilcloth for the bottom of the suitcase. The possibilities are infinite!
Michele was our honors student. She has a business called blackcap bags. Check her out. She has an artist's eye for color and pattern, and, having seen her make a suitcase, I can attest that her creations are meticulously crafted.
This lady know how to sew a suitcase!
Half done. Well, the outsides anyway...
The whole experience was kind of like childbirth. There's a lot of structure to this suitcase and it's an awkward shape to manipulate through a narrow channel. The process required both physical and mental strength. There were moments that were painful and terrifying along with intervals of creative fulfillment.
Still needs lining, but not looking too bad from the outside!
Now that the suitcase has been brought forth and I'm playing with it's little zippers and pockets and everything, the painful memories are fading. I'm beginning to think that maybe, someday, I'd give him a little sister. Maybe something in a pretty floral print....

Michele's masterpiece
My full pattern review is here.

Saturday, January 18, 2014

My First Fly Front

I'm participating in the Make a Garment a Month challenge and the theme for January is to learn a new skill. I figured it was time to dive deep into the ocean of my sewing fears and try a fly front.
My first fly front!
Kristy of Lower Your Presser Foot has made up a Burdastyle trouser pattern that I'd been eyeing. They looked so great on her, I decided to give it a whirl. With this style of trouser, my cowardly method of moving the zip to another location wouldn't cut the mustard. Time to gird my loins and get to it.

I used some stretch twill in a nice greenish-gray that I got at Britex last time we were in San Francisco. Lesson #1 - don't buy fabric for trousers unless you've checked how much yardage you're going to need. I thought 1.5 yards of 54" fabric should be fine. I'm only 5'2" for gosh sakes. Turns out it takes more fabric than you might think to wrap all the way around your legs. I had to get extremely creative with my cutting layout, including having the front pieces cut North to South and the back pieces cut South to North. When I got done I could stash my leftover fabric scraps in an egg cup.

I figured out pretty quickly that using Burdastyle instructions to insert your first fly front was a bad idea. I read those instructions 15 times and was still at a loss. 

Boy am I glad I live in the information age. I scoured the internet for information on fly fronts and found a Threads tutorial by Sandra Betzina that I actually thought I understood. Sadly, her pattern was using cut-on fly facings. I had already cut my pieces according to the Burdastyle pattern, which has separate fly facings. And no way could I re-cut anything. I manhandled my pattern pieces into a construct that more or less let me follow along with Sandra and ended up with something that works, and doesn't look too bad from the outside. The inside's a different story. Looks like one side of the zip attacked the other and ripped its guts out.

This is the good side. The bad side is too terrifying to show to the public.

front  

back

side - the top is one of my 700 Renfrews

Love those pockets
The trousers actually turned out pretty much as I hoped they would. It is so great having fellow sewists who act as pattern testers for me. I was looking for something a little slimmer-cut than my last few pairs of pants. I wanted them to be kind of like a nice, comfy pair of weekend jeans. Only I'm not ready yet to sew a pair of jeans. Maybe for 'Face Your Fears 2015.'

I have another piece of stretch twill that's earmarked for my second try at these. I can tell you one thing for sure though, I'll be altering that pattern to use a cut-on fly!

I should be able to do that by just lining up the seam lines for the fly pattern pieces with the seam lines for the center front pattern pieces, right?

My pattern review is on PatternReview.com here.


Friday, January 3, 2014

Burdastyle Pajama Style Pants

Front view
I've had these photos done for days, but haven't had a minute to write up my post. The Boy served as my photographer while he was here for Christmas. We went down to Long Marine Lab, thinking we'd have the Blue Whale skeleton as a background, and then decided all those bones would be too distracting.

Side view
These are the Pyjama Style Pants from the May, 2012 issue of Burdastyle. They have a slanted button front closure that looks challenging, but really isn't because it's non-functional. The pants zip up the back. It is a nice opportunity to use a statement button, though.

Back view
The pants have nice, big inseam pockets; handy for car keys, dog treats and giving you a bit of swagger when you walk.

They're made of some mid-weight denim with a very nice drape that I got from Hart's Fabric. I wish I'd gotten more of it while I had the chance.

It was a bit of a head-scratcher figuring out how to do the cross-over on the front, but the directions were actually pretty good. I just took them a step at a time and it all worked out. If you can handle high-waisted wide-legged trousers, I really recommend the pattern. They're very comfortable and the front waist gives them a bit of je ne sais quoi.

In fact, I liked them so much that I made them two more times; once as shorts:

Fun with Stripes Shorts
 And once from some loose-weave brown and mustard checked cotton. I must have had functional fixedness when planning this version, because this fabric looks almost the same as the fabric they used in the Burdastyle photo shoot.
Checked trousers
 Just noticed that I crossed the front right on one pair and left on the other. Probably one direction is male and the other is female?

Gray Whale skeleton in the background - too distracting, right?
My full review is here on PatternReview.com