Wednesday, January 30, 2019

Holiday Sewing

Why, yes, I am still finishing up some of my holiday gift sewing. How about you?


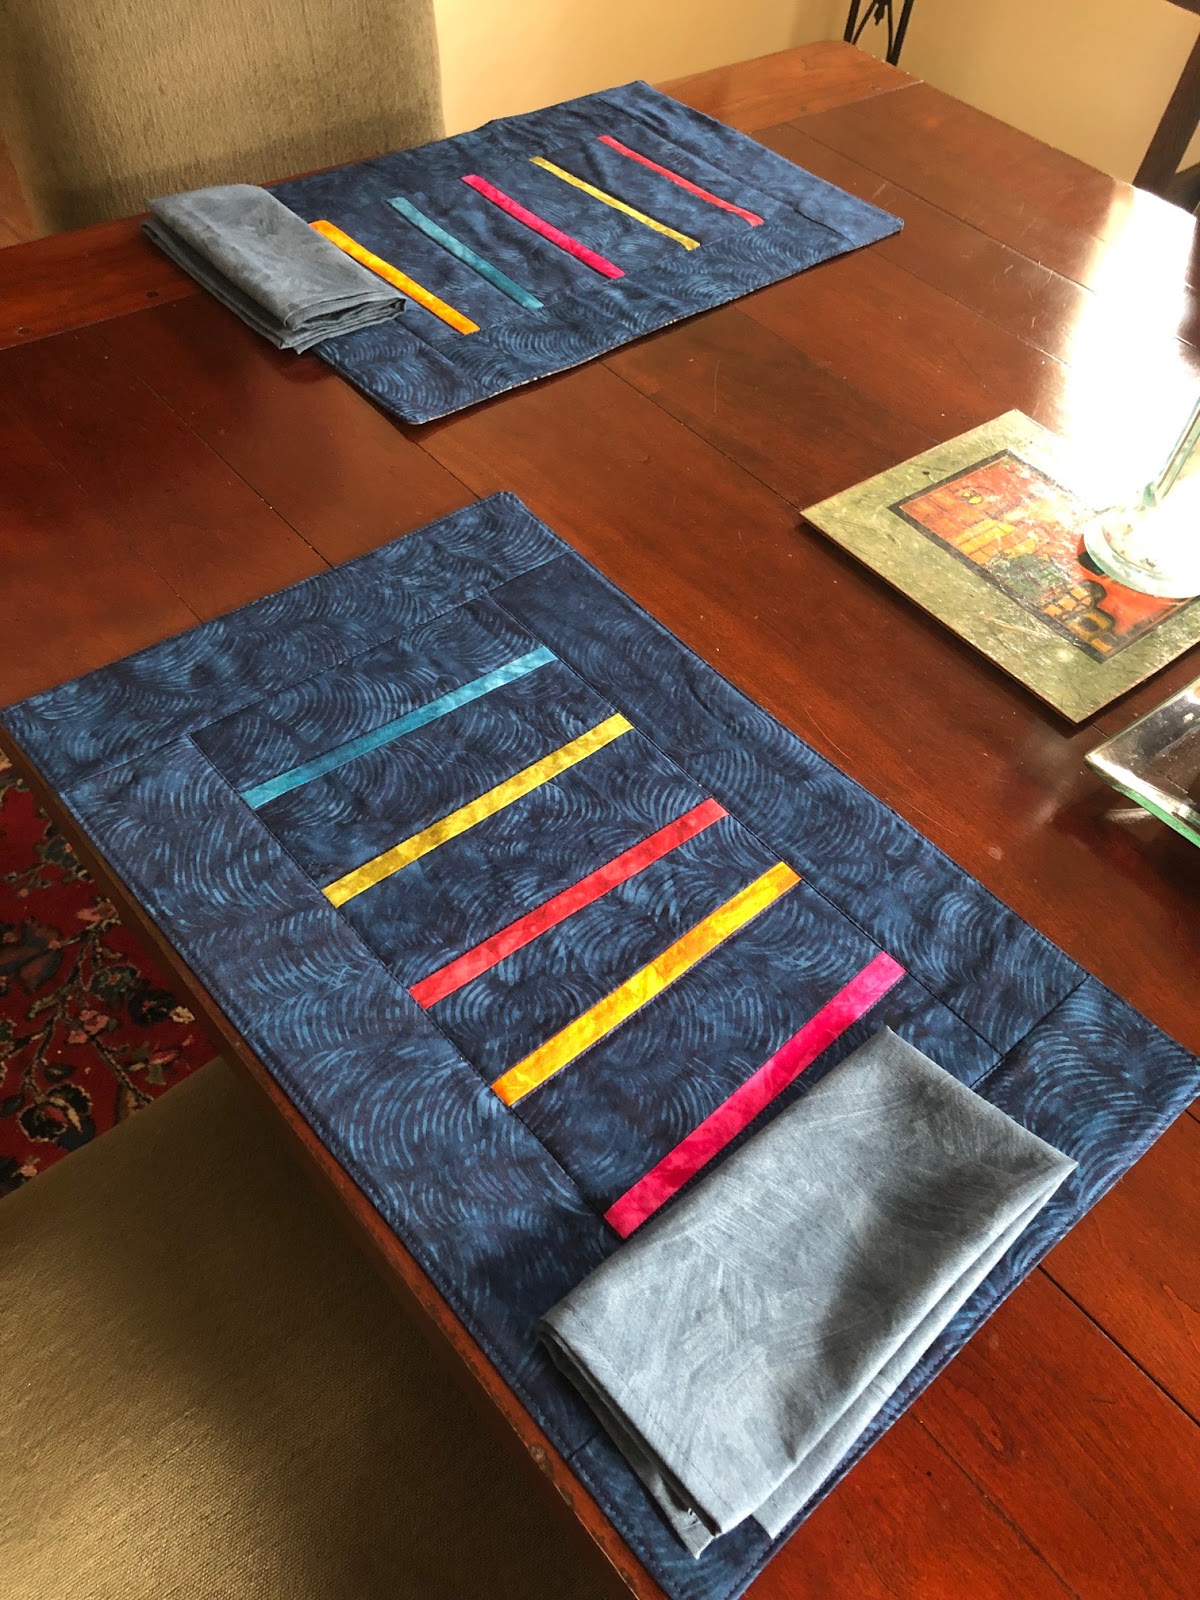
Here it is: a set of six placemats, with napkins, for The Man. I'd made him placemats for his birthday some years ago. It was probably not the most exciting birthday gift he'd ever received, but we have used them enough that they've started to look pretty beat up.

I made those original placemats at my sister's house so the he could be thrilled and surprised when he opened the package. This time I made them at home so he could hear me cussing and ripping. As I'd told my nephews all those years ago, if you grow up to have a girlfriend who makes you placemats for your birthday, what do you say? "Wow, now I know how much you must love me because placemats are a big pain in the ass to make."

I stole the idea for the pattern from a booklet called Magic Inch Quilts that I got at Back Porch Fabrics in Pacific Grove. I was there to admire a quilt display with a couple of friends. One of the quilts from this book was hanging on the wall and I thought it looked very nice; colorful and happy and moderne.


The book is only 25 pages long. It explains the "magic inch" technique and then gives you some quilt patterns to practice its use. The patterns are all pretty cute, I think:

Cute quilt one

Cute quilt two
To deploy the "magic inch," you start with a fabric block of your chosen dimensions. I cut six blocks sized 8 inches by 15 inches. Then you cut a bunch of one inch strips in contrasting fabrics.

Then you slice up your fabric block and insert those one inch strips in whatever fashion tickles your fancy. I did slightly wonky stripes.


Since you are inserting a one inch strip of fabric and subtracting four 1/4 inch seam allowances, the measurements of your original block stay the same. Magic!

The technique is straightforward and it feels very improvisational and happy-go-lucky, but you have to be accurate with your cutting and seaming. And with your pressing and fabric handling, so that your little bitty strips don't get torqued. As with most quilting, precision counts. Otherwise Bad Things can happen.

Cleverly, I gave myself some insurance by cutting my blocks at 8 x 15 when I wanted a finished size of 7.5 x 14.5. A couple of those blocks just barely trued up at the end.

I don't think I have the skills or the patience to make a bed-sized quilt featuring this technique, but it was fun to try. It might also be fun to play around with as an embellishment for garment sewing.

Saturday, January 26, 2019

Burdastyle Twisted Tee

I've noticed my eye being drawn to twisted tees lately. I made this one back in February of 2018. It's a french terry; warm enough that I didn't wear it much during the summer and fall, but I did wear it on our recent trip to Tahoe and was reminded how much I like it.

Here's this year's twisted tee:

This year's twisted tee, BS 01-2019-113
And here's last year's twisted tee:

Last year's twisted tee, BS 02-2018-107
So, why not just make up last year's pattern again? Well, here's the line drawing:

BS 02-2018-107
The cut of the neckline is a bit...extreme. It drapes nicely enough when I'm wearing it, but it doesn't fit like a normal tee-shirt neck, that's for sure. It's hard to really see this from the line drawing, but there are only two pattern pieces here; a front and a back. The sleeves are cut on and that left sleeve wraps up around from the back pattern piece. It was confusing as heck to sew together, and it was no fun to cut out either. The cutting layout used even more fabric than I imagined it would.

In contrast, here's 01-2019-113:
BS 01-2019-113
The neckline is more like your garden-variety tee, and the sleeves have their own pattern piece. Hey-hey, I thought. Should be easier to put together, and take less fabric to boot. Like a regular tee, but with that je ne sais qui that explains why I need yet another knit top in my shirt drawer.

When I got it done and tried it on, I wasn't best pleased with it. The reason should have been apparent from the magazine photos, and probably also from the line drawing. With this tee, the folds drooped down around my hips instead of defining my (admittedly imaginary) waist.

When I laid last year's tee over this year's tee, the curve on the left sides was pretty much the same, but the curve on the right side, which creates those drapey folds, was much shallower.

Last year's tee is on top, showing the more extreme shape.
Nothing ventured, nothing gained, right? So I pinned the curvier seam onto this year's tee and re-sewed that side.


I had to fudge the underarm area, because the sleeves are a different cut. I think it pretty much worked though. I also shortened about three inches at the hem. I like the fit a lot more now. In fact, I like it enough that I think I'll use this pattern again.


I tried to transfer the changes back to the pattern. We'll see how well that works out for me.

Side view
I used a Laguna jersey for this version. I have a hunk of navy and white knit in an abstract floral print that's been lurking in the fabric closet. I think I'll cut into that for my next try.

back view
I think I'll try a sleeveless version with that fabric. Well, "sleeveless" will look more like short sleeved, since the shoulders are so dropped. It might make a cute summer top.


I think I'll also try to corral that bateau neckline. It's wide enough that it wants to slip down off my left shoulder. Which would have been cute 40 years ago, but not so much now. The fact that it's my left shoulder that gets exposed probably says I could fiddle with the shaping at that right underarm. Maybe I'll throw this top onto Mini Me and see if I can drape it into submission.

My pattern review is on PatternReview.com here.


Tuesday, January 22, 2019

High Waist Undies

I'm not sure why it took me so long to trace out this pattern and give me-made undies a serious try. This is Jalie 2568. I bought it about two years ago, based on positive reviews on PatternReview. I've tried a couple other underwear patterns and they were fine, but this one looked like it would hit all the high points for me.


My go-to RTW undies were the Victoria's Secret High Leg Briefs. I liked the fit. The waist fell pretty much where mine did. They're usually on sale, so I could get 5 pairs for $25, and they have a nice store in San Francisco. Once a year, I'd stock up. 

Then, as happens all too often as one ages, things began to change. Waistlines on garments began to drop. Low rise jeans got super popular. And my High Leg Briefs morphed into Low Rise Briefs. That means that the waistline elastic cuts right across my hip fluff, resulting in Visible Panty Lines when I wear knit dresses and skirts. Plus, this style started to get harder to find. Victoria's Secret is now all about the thongs and the boy shorts and the Brazilian hipsters. 

So I sat down one day last week and cut myself out a few pairs of Jalie 2568. I'm now a true believer. 

Cute camisole too!

They're very quick to sew up. The legs really don't require elastic edging to stay in place. And, once I added a couple inches to the rise, they really do come up to my waist. The fit is great; I don't notice I'm wearing them even when I try to concentrate on them. I want a drawer full.

I used a brushed cotton lycra blend that I got at Hart's. The purple roses are scraps from my Brasov top and the teal roses I bought special for this project. I got a yard of the teal roses for $9, so I can make these undies for cheaper than Victoria's Secret. Especially if you factor in a trip to San Francisco. 

I complicated the construction by trying to enclose the crotch seam as described in a great tutorial by Very Purple Person. Even though I pre-pinned and thought I had it right for the first pair, I screwed it up and ended up with my crotch lining on the outside of my undies. Ripped it out and did it again. 

On the second pair I was certain sure I had everything done correctly, so I sewed it up. And I did have it done correctly, but I'd sewn the crotch lining to the rear leg opening. Doh! Ripped it out and did it again. But, by George, I'm sure I've got it now and subsequent pairs will be right first time, every time.

These undies, along with the Seamwork Florence and the Ohhh Lulu Hyacinth, will take care of my lingerie drawer from now on. Game on!

My pattern review is on PatternReview.com here.