Tuesday, December 29, 2015

70's Pants Redux

Ever since I made my Burdastyle 70's pants back in 2014, I've been kind of wanting a pair in denim.


Now they are mine!
70's Pants, #109 from the June, 2012 Burdastyle
I really like the forward seams on these pants, along with the inseam pockets. Once again, I omitted the back pockets and moved the zipper to the center back. I've done enough fly fronts by now that they don't scare me the way they used to, but I kind of like the cleaner lines.

I used some fairly lightweight denim I got at Hart's. I bought two yards, thinking it would surely be enough, but I had to resort to creative pattern placement to squeeze out those super-wide legs.

Side view
Now that I'm fully retired I find I take a more relaxed approach to my various projects. If I get tired or hungry or frustrated or bored, I step back and do something else for a while. You might think this would result in fewer "oh sugar" moments, but instead I've had to wrestle with a factor that I learned about in a project management class decades ago: ramp-up time. When you have to set aside a project before it's completed, ramp up is the time required to step through your process and remember where the heck you were and what the heck you were doing when you put that project down. Skimping on ramp up time is always a mistake. Trust me.

With these pants, for example, I put the pieces aside to make dinner just after finishing the side seams. When I picked them up again, I got so involved in installing the zip before stitching the inner leg seams (brilliant me!) that I forgot to finish the pockets until after everything else was constructed. Doh! Ramp up time failure.
Rear view - I think some of the wrinkles are because  my hands are in my pockets
I hemmed these pretty long; long enough that I have a huge pair of clogs on underneath and they're totally invisible. In my experience, denim keeps shrinking a bit every time you wash it. If I don't hem my denim pants on the long side at the get go, they're too short in a month or so.


My friend Gillian thought this pattern would look nifty made up as a skirt. I can't stop thinking about that, so I'm afraid I'm going to give it a try one day soon.

If you're tempted by the pattern, you can download it from the Burdastyle website here.

My pattern review is on PatternReview.com here.

Sunday, November 29, 2015

November Burda Challenge - Birthday Dress!

My November Burda Challenge is completed. And before the end of the month too! I scored the current issue of the magazine at Stone Mountain and Daughter in Berkeley while on a birthday junket with my friend, Lisa. This is Sheath Dress #114.


According to Burdastyle, "The fitted dress follows the figure due to the perfectly placed darts diagonally toward the breastline as well as along the length to envelope the silhouette - especially accented by using fabric with a stretch. The closure zipper is tucked into the left side seam. A zipper at the shoulder seam allows the cut-on collar to lay beautifully."

Line drawing from Burdastyle


The darts are what we used to call "french darts," back when I was a youngster. I always thought they sounded a little risqué; just the kind of darts that would envelope the silhouette. Sadly, the finished dress is a bit too loose to qualify as an envelope. I took the side seams in an inch at the bust and the fit is still what I'd call "comfy."

I'm always a little nervous about installing zippers, even though they usually don't go bad on me. It felt even more dangerous in a knit. So why double my stress by installing two?  I decided to use just one zip and to move it to the center back seam. As it turned out, it went in easy peasy lemon squeezy. No rippling at all.


I used a teal blue ponte that I'd bought at Stone Mountain & Daughter some years ago. Still stash busting those knits!

Back view - there's some nice shaping going on with that center back seam
While this isn't my favorite of the Burda dresses I've sewn, I like it pretty well. The fabric and the long sleeves make it nice and cozy for chill winter evenings, and the color makes me feel festive.


I wore it with boots and a velvet scarf to the theater and dinner last night and it felt like just the ticket.  The Man treated me to Riverdance and a steak with fried shallots for my birthday. He's a doll!

My pattern review is on PatternReview.com here.

Thursday, November 12, 2015

A Stash Busting Coat

The September theme for the Stashbusting Sewalong was Outerwear/Seasonal Change. I actually started this coat more or less on schedule. Finishing was another story. Partly I blame the weather. We had an unusually long and hot fall. The kind of fall where I spent much of my day flopped on the couch in front of the fan, sapped of the will to live.


Burdastyle January, 2012, jacket #107
Partly the fault lay with my sewing skills. My friend, Lucy, recommended this pattern as a good prospect for my first coat. She made one herself, which is utterly adorable. Lucy made her version out of a boucle fabric, and, wouldn't you know it, I had a boucle-ish fabric in stash that would be just enough to cut this bad boy out. Well, it's not really boucle. It's more like cream colored fuzzy worms squiggling on top of a black mesh that frays madly. It looks nicer than that sounds though.


back view with seam
I really like the style of the pattern; it's shaped to the figure at the side and center back seams. It has a two piece sleeve for a nice fit at shoulder and arm, and it's lined.

That two piece sleeve was a first for me. I learned:
  1. mark your notches carefully, because the sleeve seams do not match up with the side seams, and
  2. it's really hard to mark your notches carefully on this fabric
I put a sleeve in wrong twice, once on the lining and once on the actual coat. I was worried I wouldn't be able to pick out the stitches on my coat fabric without making a huge mess, but it worked out OK.


Lime green lining
The lining was another challenge. This is the second time I've lined a garment. I'm generally what I like to think of as a thrifty sewist. If you line a garment, that means you're making it twice, meaning you have to shell out for twice the material. There was just no way to pretty up the seams on the innards with this fabric though, and I just happened to have some lime green cotton sateen sitting in stash that looked like it would do the trick (thanks, Jessica!). 

I trawled the internet to find something to supplement Burda's terse instructions on bagging the lining and ended up with a Threads tutorial that helped immensely. It was still a bit of a struggle but everything worked out in the end. I just hope my finish is neater on my next go.


Burdastyle wanted me to add big patch pockets and a ruffle at the neckline.

Line drawing from Burda site - you can buy the pattern there if you want
 Cute, right? I made up the pockets, but they just didn't look right when I pinned them on for placement, so I left them off. Even though I know I'll miss them.

Besides being kind of bulky and a pain to handle, my fabric had a definite wrong side, so I couldn't get the ruffle thing to happen either. I've decided I kind of like the clean look of the plain neckline though.


Plus, I'm a knitter with an extensive collection of scarves and cowls, so I can fluff up the neckline easy as pie.

In short, Lucy steered me straight. This is a great pattern and I highly recommend it for a first coat. I have some blue wool in stash that I think I'll earmark for the jacket-length version of this baby. Definitely with pockets next time.

My pattern review is on PatternReview.com here.

Wednesday, October 28, 2015

October Burda Challenge Just in Time

Just under the wire, here is my October garment for the Burda Challenge.


It's top #103 from the October, 2014 issue of Burdastyle. I should have hoiked it down a bit before The Man snapped my front view here. I used a not especially drapey 100% cotton jersey for this top, so the cowl neck needs some supervision to lay nicely.


The line drawing is actually top #104, which is identical to top #103, except all sliced up for color blocking. They also show this pattern lengthened to make a very cute dress, perfect as a LBD for cocktails.

It would have been a quick sew, if not for those little yoke pieces formed by the back shoulders wrapping over to the front. Cute, yes? But Burdastyle instructions sank to a new low when describing the construction of the shoulder seams. I'm not kidding; I pined those suckers together six ways to Sunday and could not get the product to look like it should.

back view
Thank God for the internet! This top has been reviewed 6 times on PatternReview.com. Actually, more than that if you count the reviews for the color blocked and dress versions. Everyone likes the product, but most everyone had a heck of a time with the shoulder yoke. Luckily for me, PR comrade runaroo linked to a blog post from SMF Designs and Friends. In that post an angel named Roz will walk you through constructing this top, with pictures. Roz, if you are out there, I owe you a dozen roses.

side view
Once you get the shoulder construction, you can bang one of these tops out in an hour. Something I intend to do once I find that piece of slinky brown and blue knit that's hiding someplace in the stash closet.

My pattern review is on PatternReview.com here.

Thursday, October 15, 2015

September Burda Challenge - Better Late Than Never

I've fallen sadly behind on my sewing challenges this fall. I think it's a combination of hot weather and being out of town. This is my offering for the September Burda Challenge, and also for the (August) Scary Fabric Theme for the Stashbusting Challenge.


Meet blouse #111 from the 09-2011 issue of Burdastyle. They describe it as a sophisticated blouse boasting intriguing sleeve section seams. Those seams are pretty well disguised by my fabric choice, so here's the line drawing:


My result looks more like something I might have worn to Woodstock than the "splendid couture style" Burda described. But I'm OK with that.

Burda recommends you use polyester georgette, which would be delightfully light and whispy. I actually had a couple of pieces of what I think is georgette in stash, but neither was big enough for this top. Those sleeves are enormous and the bottom section is self-lined, so this top burned up more than two yards of fabric.

I used a polyester silky thing that I got at the flea market here in Santa Cruz. I'd forked over my 6 bucks before I realized I'd been looking at the reverse side of the print. What looked like subtle all-over polka dots from the back were really bling-y gold polka dots that were kind of like little blobs of puff paint. But what's stashbuster to do? The overall color scheme was much nicer from the front, so I decided to embrace the bling and work with what I had.

You can see from the line drawing that I'm supposed to be sporting a slit neck with a drawstring. I omitted that because I did not relish the notion of applying a continuous bias binding to a neck slit in this fabric. Instead, I used a piece of linen yarn to gather things up to my liking and then tied it in what I hope is a permanent knot. Then I tucked the ends into the casing and closed 'er on up.

Back view
The sleeves are fun to wear, but they're not terribly practical. The opening for your had is a bit off kilter, which makes the sleeve swoosh around stylishly when you walk, but they also scoop up bits of things from the kitchen counter. I'm pretty sure there's still some dog kibble rattling around in there from this morning.


The pattern is very well drafted. All the pieces matched up perfectly, with no finicky easing. In fact, since I'd nixed the slit neck there were no fiddly bits at all.


If you fancy taking a whack at some of that 70's boho chic that's floating around out there, this is a fun pattern. I might make myself a pair of high waisted denim flares and totally relive my youth. Or I could try this again in a more sophisticated fabric and pair the top with a narrow black skirt for an evening in the city.

My pattern review is on PatternReview.com here.

Monday, October 12, 2015

Ingenue

I've been lagging on the sewing front since we got back from vacation. Maybe because it's been unseasonably hot and my fabric cutting area is the floor in the spare bedroom, up under the eaves. After a few minutes crawling around up there the sweat is blinding my eyes and I have to stagger down to the kitchen for a cooling beverage.

What's a crafter to do in such circumstances? Haul out the multitude of half-finished sweaters and try to figure out what the heck I was doing with my knitting. Wool may not sound like the best creative response to hot weather, but I can knit in the shade with that refreshing beverage at my elbow.

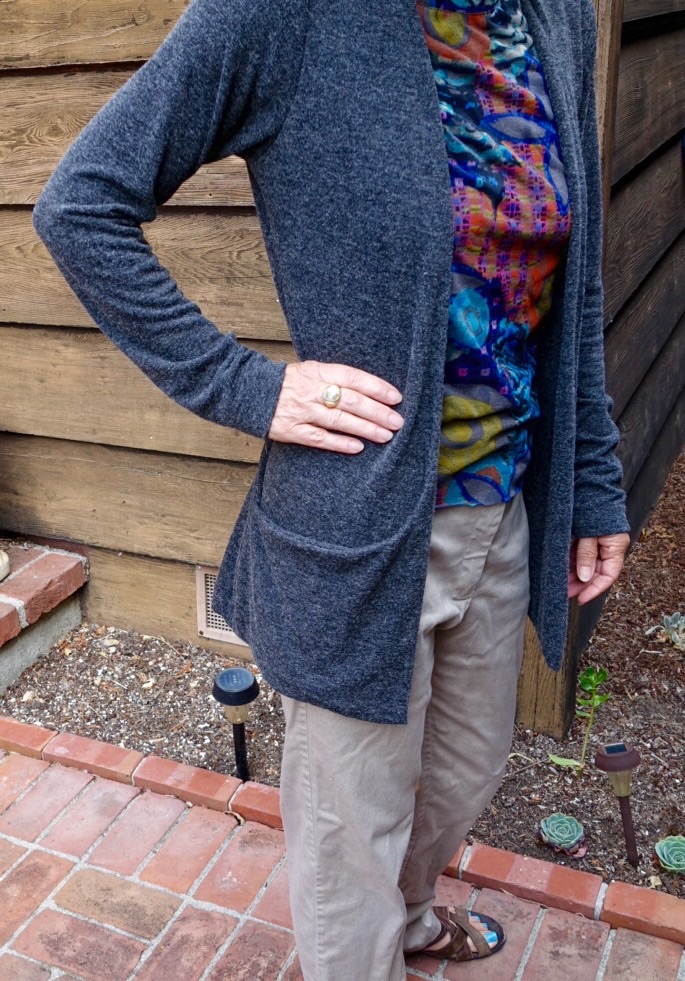
This is Ingenue, a pattern from Custom Knits by Wendy Bernard


It's a mite wrinkled because it lived balled up in my knitting bag in the upstairs closet for 18 months. I'd done the body and most of one sleeve, then set it aside.

Why? With most of my kitting projects I lose steam when I reach a point where I need to make a decision. Is it time to start the shaping for the hips? Are the sleeves long enough, or should I do a few more rows? And, most often, Will I have enough yarn to finish this thing? I have a habit of buying just barely enough yarn for a project and then panicking as I come down to the wire. The Yarn Harlot calls this "playing chicken with your knitting." It's kind of stressful, really.


'Barely enough yarn' is the reason my version of this pattern is a bit skimpier than Wendy Bernard's.

This is one of those nifty top-down, raglan sleeve sweater patterns. I mostly knit these patterns because:
  1. you can try the garment on as you go to see if you're in the right fit ballpark, and
  2. no finishing, except for weaving in your ends
The thing I'm not wild about in a top-down raglan design is the fit in the shoulder.


You can kind of see what I mean in this back view. There's almost a kimono sleeve thing going on. I don't mind it too much in a pullover, but some of my top-down raglan cardigans want to slide off my shoulders if they aren't buttoned up.

I've knit more sweaters from Custom Knits than I have from any other knitting book I own. I find the patterns are straightforward enough to go quickly (if you don't neglect them for months), yet there are enough little decorative bits to keep you from falling asleep over the stockinette.

My favorite part of this sweater is the funnel neck:


The yarn is a wool-cotton blend that I got at the going-out-of-business sale at Yarn Dogs in Los Gatos. Gosh, I miss that store.


The color is something I call "Goth Green." I don't remember what the spinner called it because I carelessly lost the ballband. Yes, all of them. The yarn is almost black, but with a mossy undertone. Kind of reminds me of The Creature from the Black Lagoon.

It blends pretty well with my wardrobe and I'm sure I'll enjoy wearing it, if this heat wave ever ends.

Meanwhile, I've almost finished cutting out the pieces for my first coat. Plus lining! I aim to finish that this week. Wish me luck.

Monday, September 14, 2015

Best Cardigan Ever

In my last minute sewing frenzy before leaving on our road trip, I made up Jalie 3248, the Drop Pocket Cardigan.


I'm not sure what "Drop Pocket" really means. The pockets are made by kind of folding back the bottom front of the cardigan into the side seam, like so:

Can you see the construction at all from this shot?

There is a knitting pattern that's been very popular on Ravelry, called Goodale, which has pockets made this way. I always liked that cardigan, but Wow! is it ever faster to sew a cardigan than it is to knit one!

I used a poly-cotton knit that I found at Hart's. It's a marled gray and sort of mid-weight. Once I pre-washed it it snugged up into a very skooshy, comfy sweatshirt sort of weight. I think this might be it; very reasonably priced too.

I rushed to finish this cardigan before we left on our trip, and I'm glad I did. It was the perfect light layer. I could throw it in the backseat and it didn't wrinkle. The pockets were just the right size to hold my car keys or a claim check or a chile relleno.


The cardigan is a pretty slim in fit, but the below-hip length gives it a nice, slouchy, boyfriend vibe. The sleeves are cut fairly narrow; Jalie says they expect you'll wear this over sleeveless tops or dresses. They're just long enough to drape a bit over my hands, and the cuffs are snug, so that I can pull them up and they stay put while I do dishes or brush the dog.

I never needed to wear this puppy outside while we were traveling. Temps were pretty warm, even in the evening. It sure came in handy when I was spending time in those air conditioned rooms though.

The front of the cardigan is two layers, which makes the finish is nice and clean. The instructions, which include very helpful illustrations, were good. I did have to scratch my head a few times though. There's a certain amount of inside-out and backwards fabric manipulation involved. Even so, it only took me a couple of hours to sew the thing together and I only had to unpick one seam. That's pretty much a record for me.


I like the pattern a lot, and I could see myself making a few more. There are some cute sweater knits around these days that would probably just suit!

My pattern review is on PatternReview.com here.


Home Again

We're back from our road trip through the Southwest. I packed my ginormous rolling suitcase with an extensive me-made wardrobe. We were gone for two weeks and still I didn't manage to wear everything I brought. Like this  dress, for example:


This is McCall's 6163, which has a bunch of good reviews on PatternReview.com. It looks like this pattern is out of print, which is too bad. It's a great one, and seems to look good on most everyone.


I borrowed the pattern from my sewing bud, Lucy. She had already cut it in a size 8, so size 8 is what I used. I'm glad I had her wisdom to guide me in sizing - the Big 4 do things in strange and mysterious ways. Looking at the chart on the back of the pattern, I would have cut a size 12 and then wondered why the neck gaped.

I used a light ITY knit that I bought ages ago at Fabrix in San Francisco. I really liked the colors and I thought I had enough to make a dress, but I was afraid it was too lightweight. When Lucy recommended this pattern, that magic pairing of fabric and project gelled.

I made View B, but omitted the collar and the sash. Also axed the side zipper. My knit is so stretchy there was no need.


Little did I know when I borrowed the pattern that it would come with Lucy's construction notes, which were brilliant. Lucy used a self-fabric band to finish the neck, so I did too. The finish look way nicer than the turn-and-stitch method recommended by McCall's, and the slight stretch she advised when applying the band keeps the neckline nice and flat while wearing.


Lucy also put the sleeves in flat and did up the underarm and side seams all in one go. Much easier that way!

My pattern review is on PatternReview.com here.

So, I don't have any pictures of this dress out on the road, but here are a couple of gratuitous vacation pictures....

Balanced Rock, Arches National Park. If you haven't been, go! The nearby town of Moab is very cute and has a nice fabric store.
Sun Palace, Mesa Verde National Park. This is a magical place - stay at the park lodge, if you can. They have a fabulous restaurant.
St. Francis Cathedral in Santa Fe. Great food, great art, wonderful people.

Monday, August 24, 2015

Road Trip Skirt

VI may have mentioned that The Man and I are off on a road trip thorugh the Southwest at the end of August. I've been sewing my little heart out, beefing up my hot weather travel outfits. This latest is from Burdastyle May, 2012; skirt #118.

Front view, demonstrating hip yoke pockets
The May, 2012 issue is one of my all-time Burdastyle faves. I've made 4 garments from this issue and I've liked each one. And I have another skirt cut out and waiting, plus I have my eye on a slightly fitted button-up blouse that might fit a couple pieces of stash fabric.

Side view
Burda describes this little item as a mini skirt with deep pleats and hip yoke pockets, which pretty much says it all. I'm a big fan of roomy pockets in a travel skirt.

Rear view
Here's a back view so you can see the pleat action. Kind of a reverse mullet; party in the front and business in the back. Burda wanted me to put two welt pockets back there, but I wasn't about to try that without some third-party instructions. Plus, the front pockets are so nice I can't imagine wanting to throw anything in a back pocket.

Close up of shaped waist-band, copper buttons and front pleats.
I used a denim-look fabric that's mainly tencel. It was a bit fray-ey and slippery to sew, but the drape is nice and it will be lighter than denim, I think. The mid-blue should go with pretty much every top I own.

Another side view
My only change-ups were to omit the back welt pockets and to put the buttons on the outside of the waistband.  Burda wanted me to hide the buttons on the inside and continue the fly topstitching on the outside so that it would appear the zipper went all the way to the top. I kind of like these copper-toned buttons, though, and I figure they carry out the jeans theme of the denim-toned fabric.

Well, one other small mod; I somehow missed the "mini skirt" part of the description, which explains why the skirt came out a bit shorter than I'd reckoned on. Burda wanted me to use a nice, deep hem, but I used lace seam binding to turn up as narrow a hem as possible.

I'd be happy to have another of these skirts, maybe in a pin-whale corduroy for winter. Next time I'll know to add a few inches when cutting out so I can mess with the length to my heart's content.

My pattern review is on PatternReview.com here.

Tuesday, August 18, 2015

August Burda Challenge Conquered

Burdastyle 08-2015-125b
And this month, challenge is the appropriate word. Do you ever have projects that fight you all the way?

Side view of pleats
These are the pleat-front pants from the August, 2015 issue of Burdastyle (pants #125b). We're getting ready to take a road trip to Santa Fe at the end of August, and I thought that a pair of loose, light cotton trousers would be a great addition to my travel wardrobe. Shorts and skirts are always on deck for a summer road trip, but sometimes you want a little sun coverage.

How did these pants fight me? Let me count the ways:
  1. The fabric, a cotton chambray with a subtle, almost gingham check, shrank up in the wash so that it had more texture and a different hand to what it did in the store (Hart's, natch). It's now a bit searsucker-y, but I decided I liked it fine that way. I tried to be extra gentle with the pressing, though, so as not to unintentionally re-shape the pattern pieces.
  2. The pattern called for 2 yards of fabric; which I purchased. And believe me, I needed every inch. This fabric was 60 inches wide, and I had to fiddle mightily to get these palazzo-style legs to fit between the selvedges.
  3. I was so proud of myself for only needing to refer to my Sandra Betzina video three times while putting in the fly. Then I snipped through the front of the pants when trimming the seam allowance. Blast and double blast!! I sort of saved things by using some iron-on interfacing on the back of the cut and then zig-zagging it closed. It's not too obvious. Fingers crissed it lasts.
  4. I finally got the pants put together with the waist band attached and tried them on. They were ginormous. I ended up taking them in 2 inches at the center back and an inch on each side. That's 4 inches. That's a lot. They're super-baggy in the butt, because I had no clue how to take in that much volume once I got into crotch-curve territory. Hence, no rear views.
Problem #4 actually hurt. I've come to trust Burdastyle and their consistent sizing. I felt so betrayed that I pulled out the pattern sheets and measured the waistband against the original. Sure enough, I'd traced the size I thought I had. Why,  Burda? Why?


Waistband with bling-y button, and a closer view of the fabric. Can you see my zig-zag surgery on the right front?

But the good news is that I do like the pants. I think they'll be cool and comfortable when I'm frolicking among the cacti in the Southwest, and the indigo color will go with most everything. I like the pleats in the front, and I like the nice, big pockets. And I can't see the rear view, so why should I worry?

The other good news is that practice is making me a more resourceful sewist. In earlier times, I would have thrown in the towel after problem #3, and problem #4 would have made me cry.

Will I make them again? If I do, I'll have to go back and re-trace. If I can figure out what size to use - I ain't trusting the size charts, that's for darn sure. Re-tracing though....gee, I don't know.


Side view with hands in pockets

My pattern review is on PatternReview.com here.