Showing posts with label pants. Show all posts

Sunday, March 3, 2019

Lander Pants

Whew! We're just coming off a rush of travel and house guests. All very fun, but it's cut into my sewing and blogging time. So, better late than never, here are some pictures from the Make the Lander Pants class that I took back in February with my friend, Jessica.

The finished Lander Pants
The class took place at Hello Stitch sewing studio in Berkeley, CA., We had a blast.


I should have taken more photos, but the day was such a blur of activity that I didn't think of it until we were heading out in the evening.


The studio space is large and light and there are plenty of tables and equipment and space. The class was capped at 7 people (if I remember right), so we all got a fair share of our teacher's time. That teacher was Beth Gavin, who blogs at SunnyGal Studio. She kept us on point. Pretty much everyone walked out with a close-to-complete pair of pants, even though some of us were changing up the construction by subbing zip flys for the buttons and slash pockets for the patches. It's fun to see a bunch of different people sewing up the same pattern. Gives you great ideas for next time.

Since we were making a 70 mile drive to attend the class, we decided to treat ourselves to a Girl's Night Out in Berkeley. We stayed at a very cute AirBnB just a mile from the class location. Too bad the weather was rainy, or we would have taken advantage of the garden table to sip our morning coffee.

Cute garden
Cute living room with french doors
All in all a very fun get away. There's nothing like social sewing.

So, on to the pants. I've been a bit smitten with this pattern ever since it first came out. It's totally got the zeitgeist of the pants of my youth. Which, I admit, was in the 70's. We used to buy those pants at the Army Navy Surplus store on University Avenue in Berkeley. They came in blue denim and railroad denim. Gee, I loved those pants. And, thanks to the wonders of sewing, I can wear them once again!

Side view
I used Santa Cruz Twill from Hart's. The pattern called for almost 3 yards. Since I'm a short person, I think I have enough left for a skirt.

Back view. I think I had more butt in the 70's
I made the full-on button-front fly and patch pocket version and I like them a lot. They're comfortable  to wear and straightforward to sew. I also love the pockets.


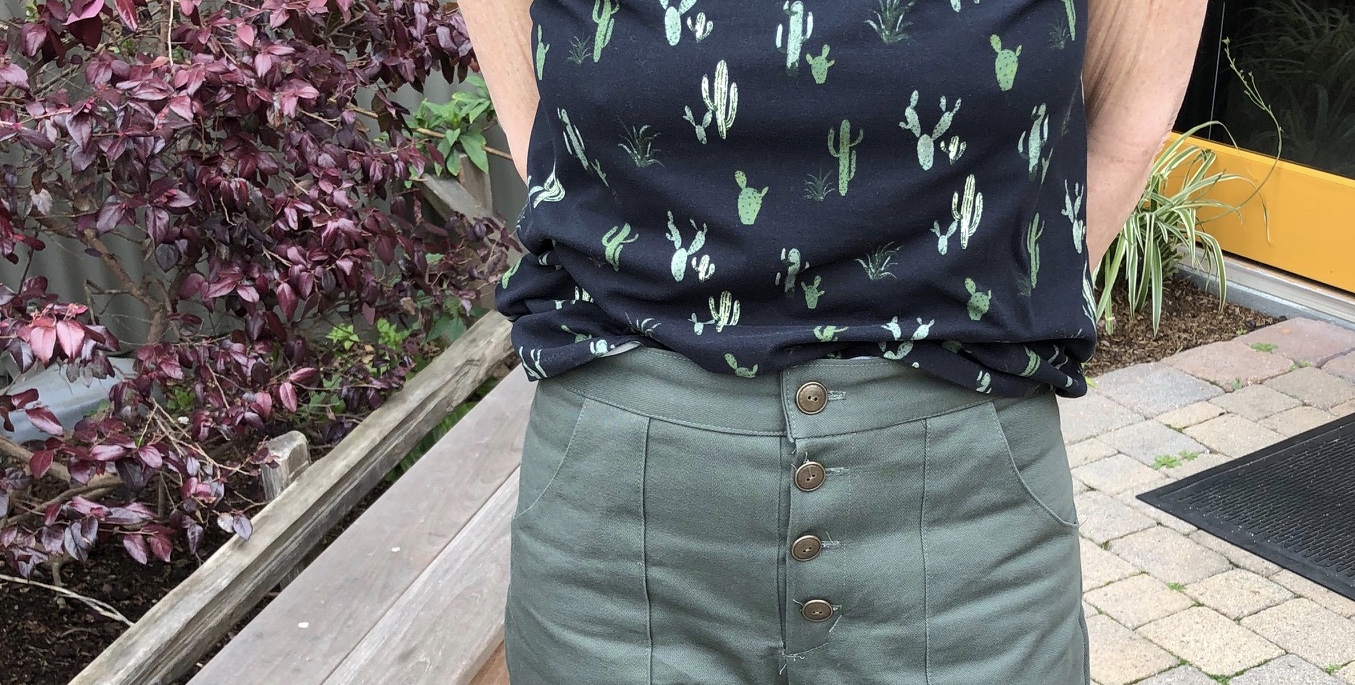
Here's a button fly closeup. The top is a Kirsten Kimono Tee made from cactus fabric that turns out to be a good color match for these pants.

The only change I'll make next time is to swap out the straight waistband for a curved one. The straight band gapes a bit on me, even though I am pretty darn straight myself.

I've already bought some railroad stripe denim to make myself another pair of these pants. Now all I need to relive my high school days is a chambray work shirt and some hiking boots.

My pattern review is on PatternReview.com here.

Sunday, August 12, 2018

Palazzo Pants

My friend, Sharon, has this pair of pants. They're not some fancy designer label, but she's carried them with her for years. Decades, even. She likes them, although they're navy blue instead of black, which makes them tricky for her to integrate into an outfit.

She thought it would be nice to recreate them before they crumble into dust, so she asked me if we could come up with a pattern to duplicate them.

Sharon's favorite pants

And we did!

Son of Sharon's favorite pants
Luckily for me, precise fit is not an issue with a pair of palazzo pants. I had her try on a pair of Loes Hines Oxford Pants that I'd made years ago, just to see if the crotch curve was in the right ballpark. It was, so I traced the inseam and crotch curve from that pattern. I added about 4 inches width in the legs and about 5 inches height in the rise and we were pretty much there.

Sharon's original pants have two box pleats in the front. They do a good job of controlling the fullness over the stomach so the fit is a bit sleeker than elastic waist pants can tend to be.

Close up of box pleats. Almost impossible to see with this crazy print.
We used a rayon print from Hart's. You want something pretty drapey if you're playing around with this much volume. We took our time going through the fabric options. Sharon wanted a print with some black in it. She wears a lot of black tops; hence the issues she had working with her navy pants.

We fondled a lot of nice prints, but the flowery ones veered too far into either "jammie" or "beach resort" territory. We decided this print looked a little more "night club."

Sharon also wanted pockets, so we added some in the side seams.

Hand in pocket
Here they are on me. High waisted pants look a lot better on someone with a waist. Can you see those box pleats doing their thing?


Here's a back view, so you can see how I parked most of the gathering at the rear.


And a side view so you can have the whole 360 degree experience.

The pants are pretty fun to wear. Those legs are 29 inches around, so you have all the swish factor of a maxi skirt.

Here's a parting shot of the pants on Sharon, taken while we were pinning the hems. Gorgeous, isn't she?

Sharon, stylin'
It was a blast putting these together with Sharon. It was interesting to play around with drafting the pattern, if you can call my combo of tracing and fiddling around "drafting."I also enjoyed thinking through the construction process.

I might just make myself a pair of these bad boys! They'd be fun to swan around in on our upcoming weekend in the wine country.

I wrote up a little something for PatternReview.com here.


Thursday, June 1, 2017

Summer Trousers

The Man and I are heading off to Idaho in July. Traveling by car, as usual. Neither of us like flying and both of us like driving, which is another indication that we are made for each other.

In preparation, I've been sewing up a thing or two to keep me cool and comfortable on the journey.

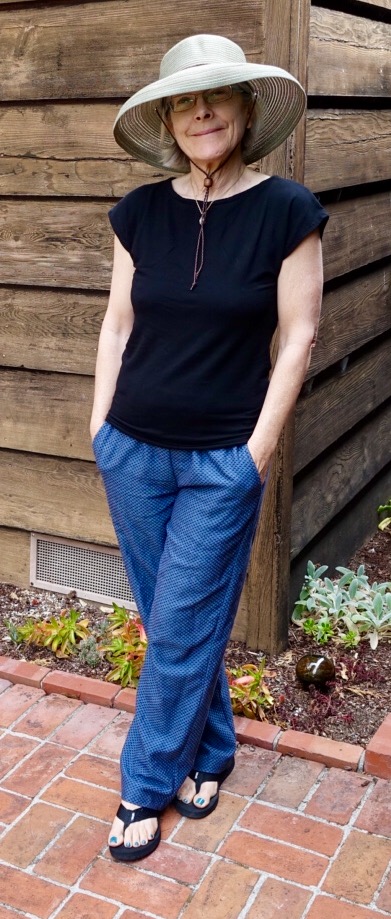
Front view
These trousers are BS 05-2013-117.  On their website, Burdastyle calls them "Tie Up Pants," which makes them sound a lot more exotic than they really are.

Side view
They're actually drawstring pants with nice, deep slash pockets. Here's the line drawing for you:


Not a lot of shaping going on, but since my waist and hips are pretty close to the same size, shaping is optional for me.


Back view
I used a light cotton chambray (at least I think it's a chambray). It's breezy and loosely woven, and it doesn't appear to need ironing after a wash, which is a definite plus for me!

Front View showing elastic waist
Here's a shot with my top hiked up so you an see how the waist sits. It comes out just about belly-button height on me.

You'll notice the lack of a drawstring. I made these pants a couple of years ago out of a brightly printed rayon and I went with the drawstring on that pair. I ended up taking it out and subbing in some elastic. I like the idea of drawstring pants but I always have trouble arranging that darn bow so that I don't end up with a lump in the front of my top.


The fabric is probably too delicate to make long lasting pants, but I think this pair should see me through vacation. Picture me sitting on the veranda at the Sun Valley Lodge, sipping a chilled, dry vin gris while watching the ice skaters twirl around in the summer sun.

My pattern review is on PatternReview.com here.

Tuesday, December 29, 2015

70's Pants Redux

Ever since I made my Burdastyle 70's pants back in 2014, I've been kind of wanting a pair in denim.


Now they are mine!
70's Pants, #109 from the June, 2012 Burdastyle
I really like the forward seams on these pants, along with the inseam pockets. Once again, I omitted the back pockets and moved the zipper to the center back. I've done enough fly fronts by now that they don't scare me the way they used to, but I kind of like the cleaner lines.

I used some fairly lightweight denim I got at Hart's. I bought two yards, thinking it would surely be enough, but I had to resort to creative pattern placement to squeeze out those super-wide legs.

Side view
Now that I'm fully retired I find I take a more relaxed approach to my various projects. If I get tired or hungry or frustrated or bored, I step back and do something else for a while. You might think this would result in fewer "oh sugar" moments, but instead I've had to wrestle with a factor that I learned about in a project management class decades ago: ramp-up time. When you have to set aside a project before it's completed, ramp up is the time required to step through your process and remember where the heck you were and what the heck you were doing when you put that project down. Skimping on ramp up time is always a mistake. Trust me.

With these pants, for example, I put the pieces aside to make dinner just after finishing the side seams. When I picked them up again, I got so involved in installing the zip before stitching the inner leg seams (brilliant me!) that I forgot to finish the pockets until after everything else was constructed. Doh! Ramp up time failure.
Rear view - I think some of the wrinkles are because  my hands are in my pockets
I hemmed these pretty long; long enough that I have a huge pair of clogs on underneath and they're totally invisible. In my experience, denim keeps shrinking a bit every time you wash it. If I don't hem my denim pants on the long side at the get go, they're too short in a month or so.


My friend Gillian thought this pattern would look nifty made up as a skirt. I can't stop thinking about that, so I'm afraid I'm going to give it a try one day soon.

If you're tempted by the pattern, you can download it from the Burdastyle website here.

My pattern review is on PatternReview.com here.

Tuesday, July 1, 2014

Style Arc Barb and Still More Knits

I finally tried my first Syle Arc pattern and I have to say I'm a believer.

Front view
The Clothing Engineer very kindly pointed me to a joint promo by Style Arc and Threads Magazine offering a free PDF download of the Barb stretch pant pattern. I'm the kind of gal who does not look a gift horse in the mouth. I hopped on over and signed up right quick.

Side view
Style Arc offers their patterns in a single size only. I decided to go for the size 8, even though my hips would put me in a size 6. I didn't want the fit to be too snug. The 8 matches my waist (more or less).

Rear view
What a happy surprise to find they sent me the size 6 and the size 10 as part of my bundle! Instead of printing out the 6 and the 8 and trying to merge them, I just went with Plan A and used the straight size 8.

The PDF was set up differently to what I've seen before. The pages printed so that the pattern lines overlapped at the bottom and the right edge of each page and it wasn't necessary to trim the edges to match up the pattern lines. Does that make any sense? I could just lay the pages out and tape them together with no sicssors required. I had to be a bit more careful to line things up because the print lines didn't go all the way to the edge of the paper, but the whole taping part went much quicker.

Top tucked in so you can see how high the rise is
Looks like I've hemmed these a bit too long. I was traumatized as a teenager by a pair of too-short pants so I still struggle with hemming issues. Otherwise they came out just as I hoped they would; slim but not skin tight and really comfortable to wear. The waist comes up to my true waist, which is just the height I prefer. I could see myself wearing these pants with a shirt tucked in - something that is almost never the case for me with an elastic waist. The pattern calls for 2 inch wide elastic, so the waistband sits nice and flat.

I've admired StyleArc patterns for some time now, but hesitated to put in a order because I wasn't sure of how their sizing would work for me. With one size per packet you don't have much fudge room. Now that I've tried them out, I feel like I can order with confidence.

My pattern review is over on PatternReview.com here.

And, in other sewing news, I made a quick stop by Backstitch over the weekend and gorged myself on more knits. 

Deanna with my pile of goodness
I feel a tee shirt orgy coming on.

Thursday, April 10, 2014

Kicking Up the 80's

Back in December of 2013, Winnie (a.k.a. The Scruffy Badger) issued a challenge to all comers to sew up one of her fabulous patterns from the 1980's and to see how we might work them into our 2014 wardrobe. One of her lovelies was this classic:
Vogue 2753 ‘ career wardrobe’, size 8-10-12
Now I was a lass in the 80's and I remember wearing those pleated pants with panache way back when. I could hardly wait to get my sewing fingers on that envelope.
My chosen fabric
I picked out some slightly tweedy suiting at Hart's and got to cutting.

The pattern was nicely drafted and the directions were very clear. I had to do a bit of adjusting at the waist, as I'm a tad larger than a size 12 in that area. Otherwise, the cutting and sewing was a piece of cake.

These ain't no wimpy pockets
Besides the signature pleats, there were other features that harked back to the 80's. Check out those pocket pieces! Back in the day, cell phones (called "mobiles") were the size of a shoe box, so you needed a pocket that was not playing around. With these pockets I can easily stash my keys, my cell phone, a lipstick, a handkerchief, half a dozen do-nuts and a cup of coffee.

I finished the pants a while ago, except for the hemming. Once, back in high school, I hemmed a pair of pants too short. The experience scarred me for life. I still cut my pants way too long and then agonize about cutting any length off. One evening, after some deep breathing and a glass of wine, I leaped into action and they were ready for their closeup. But I needed to find the right setting for the photo shoot. Something that would do them justice.

When it comes to 80's fashion, you have to think of that icon of the decade:

Check out those shoulder pads! You don't mess with gals like that.
 As I'm sure you know, Dynasty was filmed at Filoli.


Filoli is the summer home Mr. and Mrs. William Bowers Bourne II built in 1915. The Bournes were the owners of the Empire Gold Mine, outside Grass Valley, California. The Empire produced 5.6 million ounces of gold during it's active years. The Bournes  did not skimp on their house. It's now part of the National Trust for Historic Preservation, along with its 16 acres of formal gardens.


Fioli is just outside Woodside, California, about halfway between Santa Cruz and San Francisco. So I talked The Man into gassing up the Bentley and we drove up north on a beautiful Saturday morning, when gardens all over central California were drying off after basking in some of the first rain they've seen for quite a piece.

I give you -- the pants
This was really a two part challenge: the first part was to make the pattern up, the second part was to "show how 80s styles can still kick a punch today." Part one was quick and easy. Part two was a bit hard for me. My style is what might kindly be called "eclectic." I'm pretty clueless about putting together an outfit that looks current. I tried on a few different tops and asked The Man for advice. We agreed the pants look best with something that has a bit of shoulder action going on to balance out the belly pleats. I decided on one of my Maria Denmark Kirsten tees and a pair of boots.

I recommend a fabric with drape for this style of trousers. There's quite a bit of fabric pleated into that waistband. Here's a shrug shot to give you a feeling for how much room I have in there.
I dunno. Where do you think we should go next?
From the side those pleats hang nice and flat though. The back is shaped with a couple of darts and the fit there isn't much different from the non-pleated pants I've made.

Pretending to admire tulips in the atrium
Sure they hark back to an earlier time, but I like 'em! They're the most comfortable pair of pants I own. I think I'll make them again, but I'll add belt loops. I remember wearing this style of pants with a button-down shirt and a belt cinching in the volume at the waist.

I think they'd be cute with a cropped blazer. Maybe the Victoria blazer from By Hand London. I've been eyeing that pattern.

Here they are as I wore them to work this morning. 
Photo-bombing Zoe dog.
If you're in the area, grab a chance to spend a pretty day walking around the grounds at Filoli. You can tour the mansion too, but the garden is where it's at.

 We were a bit too late for the daffodils and tulips and a bit too early for the roses, but we hit the peonies right on the button!
Bloglovin tells me I should claim my blog, so here goes: <a href="http://www.bloglovin.com/blog/11384815/?claim=md9phdbznhj">Follow my blog with Bloglovin</a>

Saturday, January 18, 2014

My First Fly Front

I'm participating in the Make a Garment a Month challenge and the theme for January is to learn a new skill. I figured it was time to dive deep into the ocean of my sewing fears and try a fly front.
My first fly front!
Kristy of Lower Your Presser Foot has made up a Burdastyle trouser pattern that I'd been eyeing. They looked so great on her, I decided to give it a whirl. With this style of trouser, my cowardly method of moving the zip to another location wouldn't cut the mustard. Time to gird my loins and get to it.

I used some stretch twill in a nice greenish-gray that I got at Britex last time we were in San Francisco. Lesson #1 - don't buy fabric for trousers unless you've checked how much yardage you're going to need. I thought 1.5 yards of 54" fabric should be fine. I'm only 5'2" for gosh sakes. Turns out it takes more fabric than you might think to wrap all the way around your legs. I had to get extremely creative with my cutting layout, including having the front pieces cut North to South and the back pieces cut South to North. When I got done I could stash my leftover fabric scraps in an egg cup.

I figured out pretty quickly that using Burdastyle instructions to insert your first fly front was a bad idea. I read those instructions 15 times and was still at a loss. 

Boy am I glad I live in the information age. I scoured the internet for information on fly fronts and found a Threads tutorial by Sandra Betzina that I actually thought I understood. Sadly, her pattern was using cut-on fly facings. I had already cut my pieces according to the Burdastyle pattern, which has separate fly facings. And no way could I re-cut anything. I manhandled my pattern pieces into a construct that more or less let me follow along with Sandra and ended up with something that works, and doesn't look too bad from the outside. The inside's a different story. Looks like one side of the zip attacked the other and ripped its guts out.

This is the good side. The bad side is too terrifying to show to the public.

front  

back

side - the top is one of my 700 Renfrews

Love those pockets
The trousers actually turned out pretty much as I hoped they would. It is so great having fellow sewists who act as pattern testers for me. I was looking for something a little slimmer-cut than my last few pairs of pants. I wanted them to be kind of like a nice, comfy pair of weekend jeans. Only I'm not ready yet to sew a pair of jeans. Maybe for 'Face Your Fears 2015.'

I have another piece of stretch twill that's earmarked for my second try at these. I can tell you one thing for sure though, I'll be altering that pattern to use a cut-on fly!

I should be able to do that by just lining up the seam lines for the fly pattern pieces with the seam lines for the center front pattern pieces, right?

My pattern review is on PatternReview.com here.