Showing posts with label Burdastyle. Show all posts

Saturday, May 16, 2020

Burda Camp Shirt in Gingham

This is that rare project that I ended up liking better than I thought I would.

I'm working through the stash while we shelter in place here on the Central Coast. About mid-pile I unearthed a yard and a half of green gingham that I got at a thrift/antique shop in Lovelock, Nevada about three years ago. I liked the cheerful color, so I scooped it up. Once I got it home I got stuck thinking of what I would wear with a green gingham...top?...skirt?...dress? Plus, after laundering I suspected the fabric was a poly blend. It felt a little crisper than cotton alone. But I still liked the color, so it sat in the stash waiting for inspiration to creep up on it.


Last week I decided a camp shirt was going to be my best bet. Simple, a bit retro to match the fabric and I could wear it with denim skirts and pants, of which there are a few in my wardrobe.

I pulled out a camp shirt pattern I'd made before. It's top #116 from the April, 2012 issue of Burdastyle. This pattern is super simple to put together. It has a cut-on button band with integrated front facing and no collar stand. As I cut it out in the gingham I had a worry that the top would end up looking like something Ellie Mae Clampett would wear to shop Rodeo Drive, but I persisted.


Turned out I had the perfect buttons in my sewing kit; little white squares that match the white squares in the gingham.


I remembered that the pattern is quite cropped, so I added 3 inches to the bottom. Once I tried it on I realized a bit more ease around the hips would be good, so I added a hem slit.


I wore it yesterday with a denim skirt and turns out I like it quite a bit!


The suspected polyester content keeps it from wrinkling, but it didn't feel uncomfortable to wear, even though it was a warm, sunny day.


I probably don't need any more gingham tops but I'll enjoy this one. I will be using the pattern again too. It's easy to put together and it's nice for big prints and patterns, since there are no darts to interfere with the fabric design. I think I feel a quilting cotton calling my name....

My pattern review is on PatternReview.com here.


Friday, May 1, 2020

Dress 106

There are two ladies who walk in my neighborhood every morning, rain, shine or pandemic. They are sweethearts and we usually end up chatting when we meet. One of these ladies usually wears what I think of as a "house dress." They're comfortable, cotton dresses that zip up the front. They look like just what you'd want to wear to power walk, or putz in the garden or bustle around your house. Not fluffy, not precious. Practical.

I want some. And here's what I've come up with so far.


This is based on dress 106 from the March, 2020 Burdastyle. They describe it as having a full-length zip in front and suggest that it will work well for women who don't want their dresses to be too girlish. Looking at the picture now, I'm realizing it's a bit mini on the model. Which would explain why I had to take a super narrow hem to keep the length at my knees. I'm five foot two (eyes of blue) so I'm not used to having to worry about skirts making up too short.


The zip isn't really full-length, as in "down to the hem," though the line drawing suggests that it is. The directions call for a 20 inch zip, which is fine. Long enough so I can get in and out with no trouble, but not so long that I'd have to worry about the zip splitting when I'm kneeling down to plant potatoes.

I had actually planned to keep the sleeves, but to shorten them to a sort of above-elbow length. The design for the sleeve was kind of cute; there was a dart at the shoulder like I've seen in some raglan tops. I thought that might give a nice fit. Sadly, I could not get those things inserted smoothly. Even after a few diligent tries. I even basted. So I decided to go sleeveless. I finished the armscye with bias tape and called it a day.


The other change I made was to redraft the round neck to a v-neck. That part worked out OK, so I'm kind of chuffed. I even remembered to draw in the new neckline with a slight curve rather than using a straight line. Suzy Furrer recommended that in a Blueprint class I took on pattern drafting.


The pattern includes instructions for making a wide fabric belt to shape my waist "softly." Which it kind of does. I think I like that part and it was pretty easy to make up. Without the belt the dress is pretty shift-like, so it can do with some shape. But I might leave the belt off while I'm digging potatoes.

All in all, I think I like the dress pretty well. It's not my dream housedress, but it will do until that one comes along.

My pattern review is on PatternReview.com here.

Monday, April 27, 2020

Burdastyle Keyhole Sweatshirt

You know how in April Burda sent out the February issue of Burda Easy instead of the April issue of Burdastyle, the magazine to which I subscribe? Actually, that Burda Easy has a couple of cute things in it. The jacket, in particular, I want to try out at some point.

Still, I was a bit blue about missing out on the April Burdastyle. Only, then they sent that along too! And I'm glad, because there are a fair few patterns in there that I'm wanting to make. First out of the gate is the keyhole sweatshirt, pattern #116.


Here's my version. I'm regretting wearing my sun hat for the photo shoot because the strap falls right across that keyhole detail. And considering the amount of work I went through to get that sucker installed, that is a darn shame.


Here's the photo and line drawing from the magazine. Cute, right?


I paired it with a mystery knit boucle fabric that I've had in my fabric cupboard for years. It's an oddly shaped remnant, probably polyester, that I found at Backstitch in Nevada City. Hats off for a moment to mourn its passing; I loved that store. It's a mix of ivory, tan and hot pink that reads as a sort of dusty rose. Very drapey and with some heft.

I had just enough to cut out this pattern, but only if I cut the neck facing out of something else. I picked a charcoal knit of about the same weight that was going to be totally obvious if I didn't get the facing to lay down and behave. Gee, I love a challenge.


My friend, Jessica, agreed this pattern was worth a go so we held a virtual sew-along to work through the project together. And let me tell you, that neckband broke us both. We read the instructions to each other over and over. Each individual word made sense; it was clearly English. And yet those words together led us into an impenetrable fog of sewing confusion. You could see where they wanted you to end up but not how they wanted you to get there.


After some shared and sustained effort, we virtually patted each other's backs in sympathy and went off to do our own thing. In my case that involved tacking the facing down on the inside by hand. I'm 99% sure that's not what Burda was telling me but sometimes a sewist's gotta do what a sewist's gotta do.


I think it came out kind of cute, but it seemed like a lot of work for a sweatshirt. It's also a bit more oversized than I would have though from the photoshoot in the magazine, and I traced one size down from my usual Burda size 38.

I am glad to finally have this fabric out of the closet and on to my back though. If you're a whiz at Burda-speak, give this pattern a try and I bet you'll enjoy it. And if you wouldn't mind sending me a translation, that would be grand.

My pattern review is on PatternReview.com here.


Thursday, September 12, 2019

Butterfly Birthday Dress

My granddaughter will be having her first birthday next week. Where has the time flown? She's grown from a tiny munchkin with a thick thatch of black hair that stood straight up to a dimpled charmer who is thiiis close to walking.


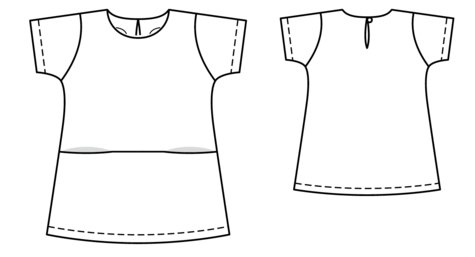
And what does a girl need once she starts walking? A dress with pockets, that's what. This is Girl's Dress from the June, 2019 issue of BurdaStyle Magazine, and it delivers some pretty perfect pockets.


Burdastyle 06/2019 #129

See that seam across the front, just below the waistline? Hidden in there are two pockets and I just love the way they're constructed.


Here are the pockets in the actual dress. They're carrying some wooden implements so you can see where they are.


And here are the pattern pieces I traced out. What you do is you fold up that extra length  on the front pattern piece and then stitch up the side of the left pocket, go across the top and then stitch down the side of the right pocket. The edges of the pockets get sewn together with the side seams.


Here's an inside view. It's a little hard to see the stitching lines because it's white thread on white fabric, but I hope you can get the idea.

I used a cotton jersey with a bright butterfly print that my old sewing teacher gifted me when she moved. The pattern is designed for a woven. The only adjustment I made was to omit the neck facings and button closure and sew on a self-fabric neck band instead, just like a tee shirt.

Back view
This was a quick and easy project that I think turned out pretty darn cute. I like it so much that I'm currently cruising adult knit dress patterns so I can try to add this pocket feature to a dress for me-me-me. I'll let you know how that works out.

My pattern review is on PatternReview.com here.

Tuesday, July 16, 2019

Kid Sewing With An Actual Kid

I am lucky enough to have a niece who is interested in sewing and who was scheduled to visit us here on the Central Coast for the 4th of July. She was only planning on being in town for 3 days and we had a lot of activities to fit in; the Boardwalk, Carmel, dog walks.... Time would be tight. Fortunately, she shopped in advance and brought 2 yards of a very cute blue floral jersey for us to work with. And double fortunately, I have 7 years of BurdaStyle magazines upstairs so I was pretty sure we'd be able to find a reasonable pattern to hand.

And here's the proof!

Burdastyle 05-2012-143
My niece didn't just come with the fabric, she came with a creative vision.


She drew a couple of quick sketches to get us going. She was after something with a V or wrap neckline and a sash with a bow. Sleeves were optional. Ideally we would have included a scalloped ruffle on the skirt, but time and fabric constraints worked against us on that front.

After reviewing a ton of Burdastyles, she decided that "Girl's Dress" from BurdaStyle's May, 2012 issue ticked her boxes. The pattern is designed for a woven and the largest available size was a 6, but as a jumping-off point it worked well.


Did I mention that Isabella is 8 and that she had never used a sewing machine before? Not a problem for her though. Within 10 minutes she'd threaded the machine and was practicing sewing accurate seams. She also batted out a few decorative stitches.

We really only had a few hours to sew, so Isabella wasn't able to do the hemming and final finishing, but she did have time to stitch up the bodice and skirt seams and complete the bow (which was our primary design element). She even included some decorative stitching and a button, setting that bow off to perfection.

Front view on the hanger

Back view

Bow closeup, with button and decorative stitching
I did the final hemming and mailed the dress off to her in Chicago with my fingers crossed, hoping it would fit her the way she wanted it to.


And it does! She totally rocks it.

I wasn't sure that an 8-year-old would be ready to tackle a project like this, but Isabella did great. Besides the creative vision thing, she took a lot of care with the process. She was willing to go slow to do well, so her seams were accurate, and she was super careful to trim all her threads neatly. She was also curious about the technical side of things. We watched some videos about how the sewing machine works and, thanks to a thread tangle, we had a chance to take the machine apart to clean out the bobbin area. We had a blast. If you ever have a chance to sew with a kid, grab it.

My pattern review is on PatternReview.com here.

Friday, April 5, 2019

A Walking Skirt for Molly

Last year my friend, Molly, gifted me with some lovely batik fabrics that her mother had brought back from Indonesia decades ago. She also asked me if I could possibly make her a walking skirt out of one of the pieces that was her favorite. I said "Sure!," and then dragged the project out for an unconscionable time because I was too nervous about cutting into this beautiful and beloved fabric.

Great colors. Just lovely.
Increasing my fears, the fabric was just 2 yards long and maybe 36 inches wide. No fudge room at all if I messed something up. Cue shallow, panicked breathing.

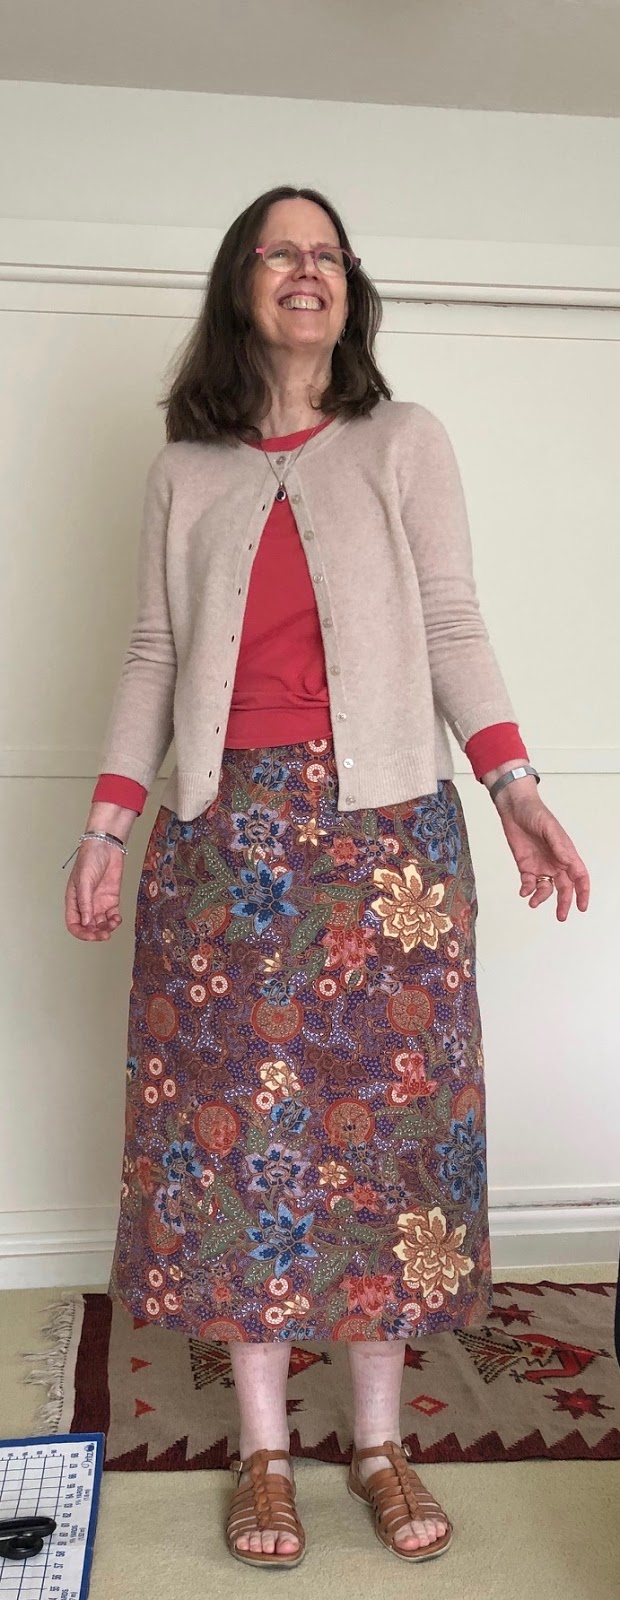
I used my favorite skirt pattern, BurdaStyle skirt #119 from the October, 2011 issue.

BS 10-2011-119

I just love this skirt. The fit is slim but comfortable, the waistband has a nice curve and the pockets are all that and a bag of chips. It's available for download on the BurdaStyle site, if you're tempted.

This time I cut the front on the fold and swapped the pockets out for inseam pockets, so as to minimize breakup of those fabulous jungle flowers. And moved the zip to the back, so I didn't have to mess with pockets and zip in the same seam. I also lengthened, because Molly likes her skirts on the longer side.

Molly's shape is pretty different from mine. She is more of a classic hourglass, whereas I am a straight up brick. I traced a new version of the pattern sized for her and made up a muslin out of an old sheet so she could see if this style would work. She gave it the thumbs up, and then it sat. For months. Eventually The Man pointed out that the fabric wasn't doing Molly any good sitting folded up in my fabric closet, so I took a deep breath and got to work with the fabric scissors.

And here are the results! I didn't have enough fabric to fiddle with pattern placement, so it's sheer luck that none of those flowers ended up in the wrong spot (if you know what I mean).

Front view

Side view

And another front view
It's been too rainy here on the Central Coast for Molly to give the skirt a real road test, but she thinks it will meet her needs.

I have fabric lined up for two more of these skirts for myself. They really are very easy to wear, and those pockets are the bomb.

My original pattern review is on PatternReview.com here.


Saturday, January 26, 2019

Burdastyle Twisted Tee

I've noticed my eye being drawn to twisted tees lately. I made this one back in February of 2018. It's a french terry; warm enough that I didn't wear it much during the summer and fall, but I did wear it on our recent trip to Tahoe and was reminded how much I like it.

Here's this year's twisted tee:

This year's twisted tee, BS 01-2019-113
And here's last year's twisted tee:

Last year's twisted tee, BS 02-2018-107
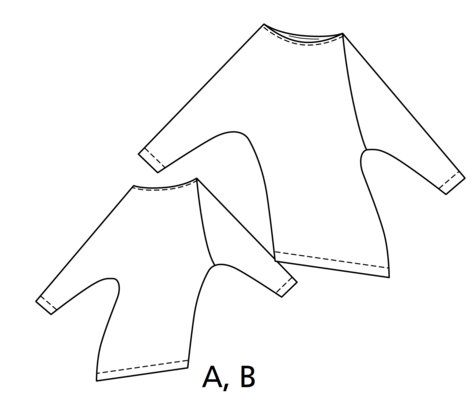
So, why not just make up last year's pattern again? Well, here's the line drawing:

BS 02-2018-107
The cut of the neckline is a bit...extreme. It drapes nicely enough when I'm wearing it, but it doesn't fit like a normal tee-shirt neck, that's for sure. It's hard to really see this from the line drawing, but there are only two pattern pieces here; a front and a back. The sleeves are cut on and that left sleeve wraps up around from the back pattern piece. It was confusing as heck to sew together, and it was no fun to cut out either. The cutting layout used even more fabric than I imagined it would.

In contrast, here's 01-2019-113:
BS 01-2019-113
The neckline is more like your garden-variety tee, and the sleeves have their own pattern piece. Hey-hey, I thought. Should be easier to put together, and take less fabric to boot. Like a regular tee, but with that je ne sais qui that explains why I need yet another knit top in my shirt drawer.

When I got it done and tried it on, I wasn't best pleased with it. The reason should have been apparent from the magazine photos, and probably also from the line drawing. With this tee, the folds drooped down around my hips instead of defining my (admittedly imaginary) waist.

When I laid last year's tee over this year's tee, the curve on the left sides was pretty much the same, but the curve on the right side, which creates those drapey folds, was much shallower.

Last year's tee is on top, showing the more extreme shape.
Nothing ventured, nothing gained, right? So I pinned the curvier seam onto this year's tee and re-sewed that side.


I had to fudge the underarm area, because the sleeves are a different cut. I think it pretty much worked though. I also shortened about three inches at the hem. I like the fit a lot more now. In fact, I like it enough that I think I'll use this pattern again.


I tried to transfer the changes back to the pattern. We'll see how well that works out for me.

Side view
I used a Laguna jersey for this version. I have a hunk of navy and white knit in an abstract floral print that's been lurking in the fabric closet. I think I'll cut into that for my next try.

back view
I think I'll try a sleeveless version with that fabric. Well, "sleeveless" will look more like short sleeved, since the shoulders are so dropped. It might make a cute summer top.


I think I'll also try to corral that bateau neckline. It's wide enough that it wants to slip down off my left shoulder. Which would have been cute 40 years ago, but not so much now. The fact that it's my left shoulder that gets exposed probably says I could fiddle with the shaping at that right underarm. Maybe I'll throw this top onto Mini Me and see if I can drape it into submission.

My pattern review is on PatternReview.com here.


Thursday, November 29, 2018

Athlesiure

Way back in March of 2015 I made a pair of sweat pants to wear in a martial arts class I was taking at the time. I've always thought of them as my Bagua Pants. I'm not doing the bagua class anymore, but I have worn the sweat pants quite a bit. So often, in fact, that they've gotten pretty beat up. I've been meaning to make another pair for a while now, so the last time I was poking around at Hart's I bought myself a couple hunks of jersey and I made two at once.


The pattern is Burdastyle 03/2014 #112 (Workout Pants). They're supposed to be drawstring pants, but I know by now that drawstrings don't work for me. I just used some 1/2 inch elastic instead.


They come up to my waist, even though they look lower in the picture above. That's partly because I have my hands in the (very nice) pockets and partly because I like my elastic loose.

Closeup of very nice pockets
Besides good pockets, these pants have an ankle cuff. The sweatpants of my youth had elastic at the ankles. As someone with sturdy, peasant ankles I always found that elastic kind of annoying. These cuffs are snug enough to keep out drafts but loose enough to be very comfortable. They're also just right to keep my pant leg pulled up out of bicycle-chain reach when I'm out for a bike ride.


I'm really ridiculously happy with these pants. The jersey is just substantial enough to make them ideal for a chilly morning. Considering how quick and easy they are to make, I have no idea why it took me so long.


I may be just fooling myself, but I think they're a little more presentable than your basic Mervyn's sweats. Not that I'd wear them out to dinner and a movie, though in Santa Cruz the dress code would certainly allow it. I think they're fine for gyming and grocery shopping, and for lounging around the house. Since I'm now retired, those happen to be my primary activities. Wardrobe sorted!


My original pattern review is on PatternReview.com here.