Showing posts with label modern quilt. Show all posts

Wednesday, February 26, 2020

Carousel Lap Quilt, Baby Sized

I recently found out that I'm going to be a great aunt in August. I'm so happy. My nephew is a doll and his wife is a sweetheart and they're going to make fabulous parents. Even better, they have just relocated right near my son and his family, which means I'll be able to swing by to visit them when I'm in town to see the grandkids. More babies to cuddle, yes!

I was so excited that I popped out a quick quilt for Baby Girl. I used my favorite quilt pattern book, Cozy Modern Quilts, by Kim Schaefer. She includes a lot of easy patterns that use big pieces; good for playing with cute kid prints. This pattern here is the Carousel Lap Quilt.


I thought I'd do an animal theme, so I went to Hart's with my advising aesthetician, Jessica, and together we tore apart the animal print section of the store. The nice Hart's ladies were probably glad to see the back of us that day.

We came up with some very cute options though; to wit:


Tigers on an orange background


Octopuses undersea


Skateboarding bears


and greedy gators.

This pattern is super quick and easy to put together. The finished block size is 8 by 8 and the offset corners mean that you don't have to actually match anything. Well, not precisely anyway.

I pieced the top in just a few days and, during a quick stop in Pacific Grove, I found a very cute animal print fabric for the backing.


I'm hoping Baby Girl Niece will spend happy hours pointing out all the little animals romping on her quilt.

Later, Gator!


Thursday, November 14, 2019

Another Quilt As You Go

Yes, it's another quilt. I actually do have a couple of garments teed up to sew, but I went to a quilt class with my friend Jessica the weekend before last so this project jumped the queue. The class covered a new-to-me quilt-as-you-go technique, and this quilt is the result.


The pattern is based on the Tic-Tak Wall Quilt from Cozy Modern Quilts, by Kim Schaefer. Each of the squares is 10 by 10 inches, so the finished quilt is 50 inches by 60 inches, or what I think of as a foot-of-the-bed quilt. Its mission is to sit folded at the foot of the bed so you can pull it up as a second cover on those especially chilly fall nights.


I used mainly Kaffe Fassett shot cottons for the big squares with a contrasting batik for the little inner squares. It's bright and cheerful, and it came together in about a week. I am a big fan of the quilt-as-you-go stye of quilting. It's quick and it feels less industrial than the more traditional quilting I've done. Instead of cutting out hundreds of little, fiddly pieces and then sewing them together with an accurate 1/4 inch seam, you work with one square at a time. You can change things on the fly; it feels a lot more improvisational. Plus, it's way easier to quilt a 10 inch square than it is to pull 6 feet of quilt through your machine.


We took the class at Back Porch Fabrics in Pacific Grove. This is a great fabric store, if you're ever in the area. They're focused on quilting cottons and they have a very nicely curated selection. They generally have an inspiring gallery of quilts hanging on the walls in the back of the store, which is where the classroom space is.


Here's the design wall with some of our first squares hung to view. Folks were working on just a few styles of blocks; it was fascinating to see how the same design could look so different depending on the fabrics and design choices each person made.

So, here's a down-and-dirty tutorial for those who may be interested in this technique.....

You start by cutting your batting to the size you want your finished blocks to be. For me, that was 10 inches square.


Then you whack your fabrics into roughly sized strips and start to sew your fabric pieces down to the the batting. Above is my central batik square quilted down to one of my batting squares.


Next I laid the first piece of the outer square atop the central square and seamed the pieces together to the batting. Then you flip the new piece to the outside and finger press.


You lay the next piece atop the prior two, sew the seam and flip to the outside again. You keep on going until your square is complete and your piece of batting is totally covered, with at least a one inch overlap of fabric on all sides. This is Greek to me, but one of my classmates said it was like doing English paper piecing, but you were piecing the fabric directly onto the batting.


Once the square is assembled, you press it and do any quilting you want to do, then trim the quilted square to size.


Here's the difference with the technique we learned in this class:


We trimmed the finished squares so that there was a 1/2 inch of fabric showing beyond the batting on all sides. When you sew the squares together, you use that 1/2 inch as seam allowance so you're sewing fabric to fabric and (ideally) the edges of the batting are butted up against each other without being caught in the seams. The idea is to avoid the additional bulk of two layers of batting in the seams.

With the method I've used before, your batting is cut to include a 1/4 inch seam allowance, so that your squares are sewn together with the batting sandwiched into the seam along with the fabric.

With either method, once your quilt top is completed you lay it out smoothly on the quilt backing and just stitch-in-the-ditch to tack the backing to the already-quilted top. Et fins!

So what's the verdict? I think I prefer the method that includes the batting in the seams. I used that method for my anvil quilt. I really don't notice the seams feeling bulky and I like the idea that the each batting piece is sewn down securely all around the edges. Just so things don't shift around when the quilt is washed and dried.

I have one more foot-of-the-bed quilt in mind, and then our house will be fully covered. I'm planning a dog themed quilt to amuse my grandson.

Next up, though, is a birthday dress for me.

Monday, September 9, 2019

Anvil Quilt Completed!

I've been thinking about making this quilt for The Man for a few months. What could provide better impetus than his birthday, which is in September. Strictly speaking, his birthday was last week, but better late than never, am I right?


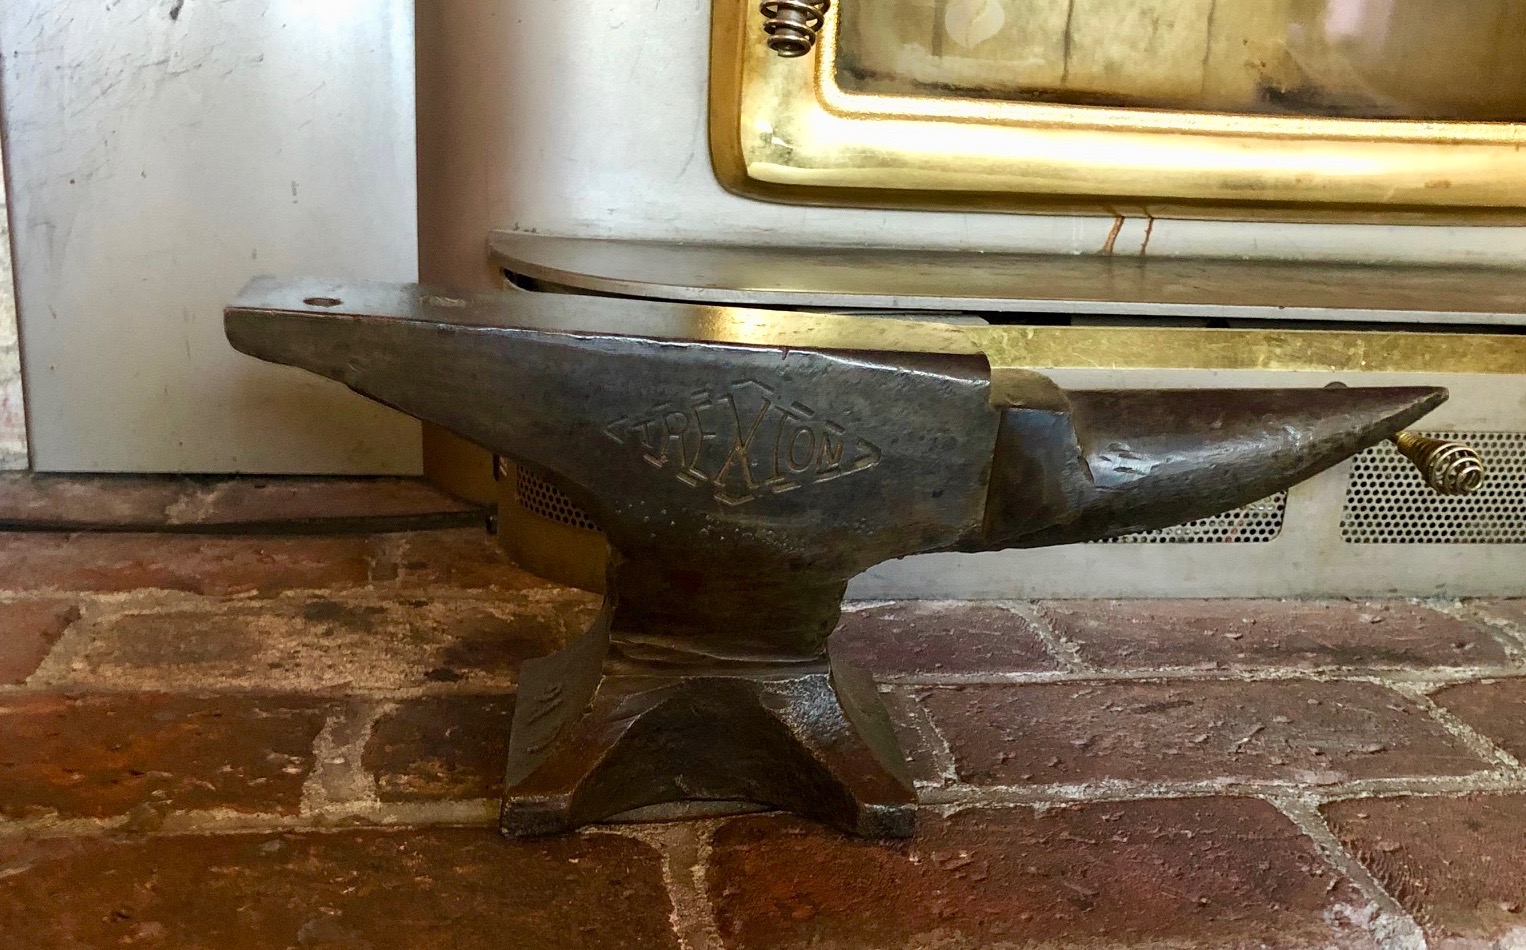
You may not know this about him, but The Man is an anvil fan with a small but select collection of early American anvils. Luckily he likes cute, little anvils. Like this one by our fireplace, which weighs 22 pounds.


His friend, Bill, is also an anvil collector, but he likes the two ton numbers. They're a bit more challenging to work into the decor.

This quilt started off as kind of a joke, but when you think about it, anvils aren't a bad subject for appliqué. They have strong, simple silhouettes and there's more variety in shape than you might imagine. The Man, of course, has what is THE book on American Anvils. More than 500 pages, all about anvils. I used the illustrations to trace my anvil patterns, so I can assure you that they are all anatomically correct.


This quilt is my second project based on the class, Cute Quilt-As-You-Go Applique Monsters, which you can find on Blueprint. My first rodeo with these techniques was with the Under the Sea quilt I made for my Granddaughter. The process is a bit down-and-dirty but it's also really fun and you can go from artistic vision to finished quilt lickety-split.

How about a few anvil close-ups? You know you want to...


Above is the classic one-horned anvil we all know and love. If you ask a kindergartner to draw an anvil, they'll probably come up with something like this.


This anvil is a bit different; it's a farrier's anvil. One horn, one drop and no table. Apparently farriers needed specialized tools to take care of those horse shoes.

Since we're talking about horns, here is a double-horned anvil.


This anvil doesn't have any horns at all. It's called a colonial or sawmakers anvil, and its job is to give a nice, flat surface for tensioning those saw blades.


Here we have an older style of anvil. It's called a bick iron. You could carry this one with you while traveling, then hammer the spiky part into a log and, voila! You could get to making horse shoes with a moment's notice


This is an arial view of the working surface of a single-horned anvil. That square hole on the blunt end is called a hardie hole and the round one is a pritchell. They're used for bending pieces of metal.


Here's an arial of The Man's Trenton anvil, so you can see the hardie and pritchell in real life.

If you've read this far, you now know more about anvils than 96% of your friends and family.

I used the left over fabric from this project to slap together the quilt back. I do like the idea of using my scraps but I keep forgetting that piecing the back is kind of like piecing a whole 'nother quilt.


I didn't have quite enough fabric to make the 6 inch wide outer border that I'd envisioned, so I did a double border with a mottled black. I had a heck of a time figuring out how to do a double border with quilt-as-you-go; my Blueprint class didn't cover that trick. While googling somewhat desperately I came across this tutorial, and it saved my bacon. Worked perfectly and was very easy to do.


Late fall tends to be heat wave season here on the Central Coast, so we probably won't be using this quilt for movie snuggling for another few months, but I'm sure it will come in handy once the days grow shorter and grayer.

Next up, a birthday dress for my granddaughter and then some more undies for me.

Saturday, June 22, 2019

Carousel Lap Quilt, Jumbo Sized

 Behold my last quilting project for a while. Well, until I need to get working on The Man's anvil quilt. "Anvil quilt" as in "it has actual anvil shapes appliquueed on it.'" His birthday is in September.

This project was kind of a beast as it's the largest quilt I've ever completed. It's queen-sized, or about 90 by 96 inches. There were a few moments during the making when I thought we were going to have to get a bigger bed, but once the quilting and trimming and binding was done it's just about the right size.


We have family coming to visit from Chicago at the beginning of July and I really wanted to offer them something nicer than our faded navy blue duvet cover. I had an idea of what I wanted and my friend, Jessica, came with me on a fabric-hunting expedition to ramp up my supplies. Then, as is my wont, I began another project instead, leaving myself with precious little time before D-Day.


Luckily I had earmarked the Carousel Lap Quilt pattern from Cozy Modern Quilts, by Kim Schaefer. This is a great pattern to use for a rush quilting job. The squares are large (the batik bits are 6 by 8 inches), and all the pieces are rectangular. Even better, the layout has the squares offset, so you really don't  have to worry about matching corners or staying super tidy.

I finished this puppy in 10 days and I took time out to have gum surgery.


I quilted it on my Babylock, using a very useful tip I got at our recent quilting retreat in Eugene: beginning quilters should use wavy lines because that makes it look like you did it on purpose. I did a line of stitch-in-the-ditch down the sashing and then waved my way down the center of each square. Badda-bing, bad-boom.


When I finished my last quilt I decided that I preferred the look of hand stitched binding, so I planned to stick to that in future. This quilt, however, had about 7 miles of binding to apply and ain't nobody got time to hand stitch that before July 1.

So I stitched it to the front, wrapped to the back, pinned pretty carefully and used my stitch-in-the-ditch foot. And it came out pretty darn good. Gosh, I love that foot. I have a bunch of feet for my Babylock that I still don't really know what they do, but this foot is one of my all-time favorites.


Quilting is fun, but I'm ready to sew me some garments. One of our visiting family members is an 8-year-old who might want to join me. I have a pile of kid-print jersey sitting in a drawer upstairs that just might be the ticket.


Friday, June 7, 2019

Quilter's Road Trip

I just got back from one of the best road trips ever. My childhood friend and I packed up our sewing machines and drove north to Eugene, Oregon for a weekend quilting retreat and we had the best time.

The springboard for our trip was a weekend workshop at The Stars Aligned, which is the brain-child of Lynndi Enright. Lynndi designed the pattern for my very favorite purse, which I've been re-making every two years since 1997. She and her mother bought two run-down houses in Eugene and remodeled them into the perfect quilter's nest.

Let me take you on a little tour....


This quilt was hanging on the wall of our bedroom. Lovely quilts are scattered all about both houses, providing warmth and inspiration.


And here's our bedroom. Comfy and cozy, with french doors into the green, green back yard.  And a shower as big as that king size bed. Gosh, I loved that shower.


From our room you'd walk down the hallway to the comfortable living room.


Which was right alongside the fully appointed kitchen and dining area. Lynndi provided eggs, muffins and coffee for breakfast and arranged for deli lunches during our stay.

If you walk through that door at the end of the kitchen, you enter the quilting studio.


I think it was originally a large garage, but it's been remodeled with great lighting, large work tables, and enormous cutting mats. Oh, and also a flat-screen TV, in case anyone wants to do a video presentation.

At one end of the studio there's another door that leads to a small but perfect fabric store.


Did you forget some sewing tool you can't live without? Need a shot of fabric mojo? Want the pattern for that cute quilt hanging on the wall in your bedroom? No problem, it's here.


The delightful Lynndi cutting fabric for a happy quilter.


A small but carefully curated selection of quilting cottons, threads and tools.


And a display of great patterns, many designed by Lynndi. Including my most favorite purse pattern ever, there on the right.

The subject of the workshop was free motion quilting. There were 8 in our class; some of us were not quite sure what free motion quilting is (yep, that's me and Lisa) and others had already taken a class or two on the technique. Our teacher, Ken Casey, is a fairly recent transplant from Arizona to  Eugene. He's been a quilter since his early 20's and he also had a career as a public school teacher. So; he doesn't just know how to quilt, he knows how to teach. In 16 hours he took all of us (yep, even me and Lisa) from a cussing crowd who thought free motion quilting was too darn hard to a room full of happily humming sewers who were having fun and thinking we'd be trying this on our next project.


Looks like a nice guy, doesn't he? And he is! But he kept us on task like a room full of unruly 7th graders.

He presented each of us with a large sketchbook and a black pen. He proceeded to clearly explain each step in the process. Then he'd have us gather round to watch him demonstrate each technique.


Then he's send us to our work tables to practice making the patterns with pen and paper. This was a great exercise. You got the feel of how to make the shapes and move smoothly from spot to spot before adding in the complication of controlling your sewing machine without the help of your feed dogs.


Once you had the feel of the pattern from your paper practice, making those same motions on our quilt samplers was much easier. In fact, I think I have become a free motion fan. I'm working on a small quilt right now, using a pattern I bought from Lynndi, and I plan to do some free motion around the border. Just to get my feet wet.


We were free in the evenings to make dinner and hang out at the house, or to wander around town. Eugene is a lovely spot. The Willamette River runs through town and there are hiking and biking trails along both banks. The weather was perfect. Just a lovely weekend!

I'll end with a couple more cool quilt photos.

Lynndi offers workshops on quilting techniques and she also rents out her space on Airbnb. She will even help you arrange a quilting weekend for you and 6 to 12 of your friends.


This is another of the quilt patterns Lynndi sells. I love how those curvy lines are made; totally doable, even for me.


These last two quilts were hanging as samples for a scrappy quilt retreat that's coming up shortly.


This last scrappy quilt looks very Gustav Klimt to me. The background isn't flashy but it reads gold.