Showing posts with label quilt as you go. Show all posts

Thursday, November 14, 2019

Another Quilt As You Go

Yes, it's another quilt. I actually do have a couple of garments teed up to sew, but I went to a quilt class with my friend Jessica the weekend before last so this project jumped the queue. The class covered a new-to-me quilt-as-you-go technique, and this quilt is the result.


The pattern is based on the Tic-Tak Wall Quilt from Cozy Modern Quilts, by Kim Schaefer. Each of the squares is 10 by 10 inches, so the finished quilt is 50 inches by 60 inches, or what I think of as a foot-of-the-bed quilt. Its mission is to sit folded at the foot of the bed so you can pull it up as a second cover on those especially chilly fall nights.


I used mainly Kaffe Fassett shot cottons for the big squares with a contrasting batik for the little inner squares. It's bright and cheerful, and it came together in about a week. I am a big fan of the quilt-as-you-go stye of quilting. It's quick and it feels less industrial than the more traditional quilting I've done. Instead of cutting out hundreds of little, fiddly pieces and then sewing them together with an accurate 1/4 inch seam, you work with one square at a time. You can change things on the fly; it feels a lot more improvisational. Plus, it's way easier to quilt a 10 inch square than it is to pull 6 feet of quilt through your machine.


We took the class at Back Porch Fabrics in Pacific Grove. This is a great fabric store, if you're ever in the area. They're focused on quilting cottons and they have a very nicely curated selection. They generally have an inspiring gallery of quilts hanging on the walls in the back of the store, which is where the classroom space is.


Here's the design wall with some of our first squares hung to view. Folks were working on just a few styles of blocks; it was fascinating to see how the same design could look so different depending on the fabrics and design choices each person made.

So, here's a down-and-dirty tutorial for those who may be interested in this technique.....

You start by cutting your batting to the size you want your finished blocks to be. For me, that was 10 inches square.


Then you whack your fabrics into roughly sized strips and start to sew your fabric pieces down to the the batting. Above is my central batik square quilted down to one of my batting squares.


Next I laid the first piece of the outer square atop the central square and seamed the pieces together to the batting. Then you flip the new piece to the outside and finger press.


You lay the next piece atop the prior two, sew the seam and flip to the outside again. You keep on going until your square is complete and your piece of batting is totally covered, with at least a one inch overlap of fabric on all sides. This is Greek to me, but one of my classmates said it was like doing English paper piecing, but you were piecing the fabric directly onto the batting.


Once the square is assembled, you press it and do any quilting you want to do, then trim the quilted square to size.


Here's the difference with the technique we learned in this class:


We trimmed the finished squares so that there was a 1/2 inch of fabric showing beyond the batting on all sides. When you sew the squares together, you use that 1/2 inch as seam allowance so you're sewing fabric to fabric and (ideally) the edges of the batting are butted up against each other without being caught in the seams. The idea is to avoid the additional bulk of two layers of batting in the seams.

With the method I've used before, your batting is cut to include a 1/4 inch seam allowance, so that your squares are sewn together with the batting sandwiched into the seam along with the fabric.

With either method, once your quilt top is completed you lay it out smoothly on the quilt backing and just stitch-in-the-ditch to tack the backing to the already-quilted top. Et fins!

So what's the verdict? I think I prefer the method that includes the batting in the seams. I used that method for my anvil quilt. I really don't notice the seams feeling bulky and I like the idea that the each batting piece is sewn down securely all around the edges. Just so things don't shift around when the quilt is washed and dried.

I have one more foot-of-the-bed quilt in mind, and then our house will be fully covered. I'm planning a dog themed quilt to amuse my grandson.

Next up, though, is a birthday dress for me.

Monday, September 9, 2019

Anvil Quilt Completed!

I've been thinking about making this quilt for The Man for a few months. What could provide better impetus than his birthday, which is in September. Strictly speaking, his birthday was last week, but better late than never, am I right?


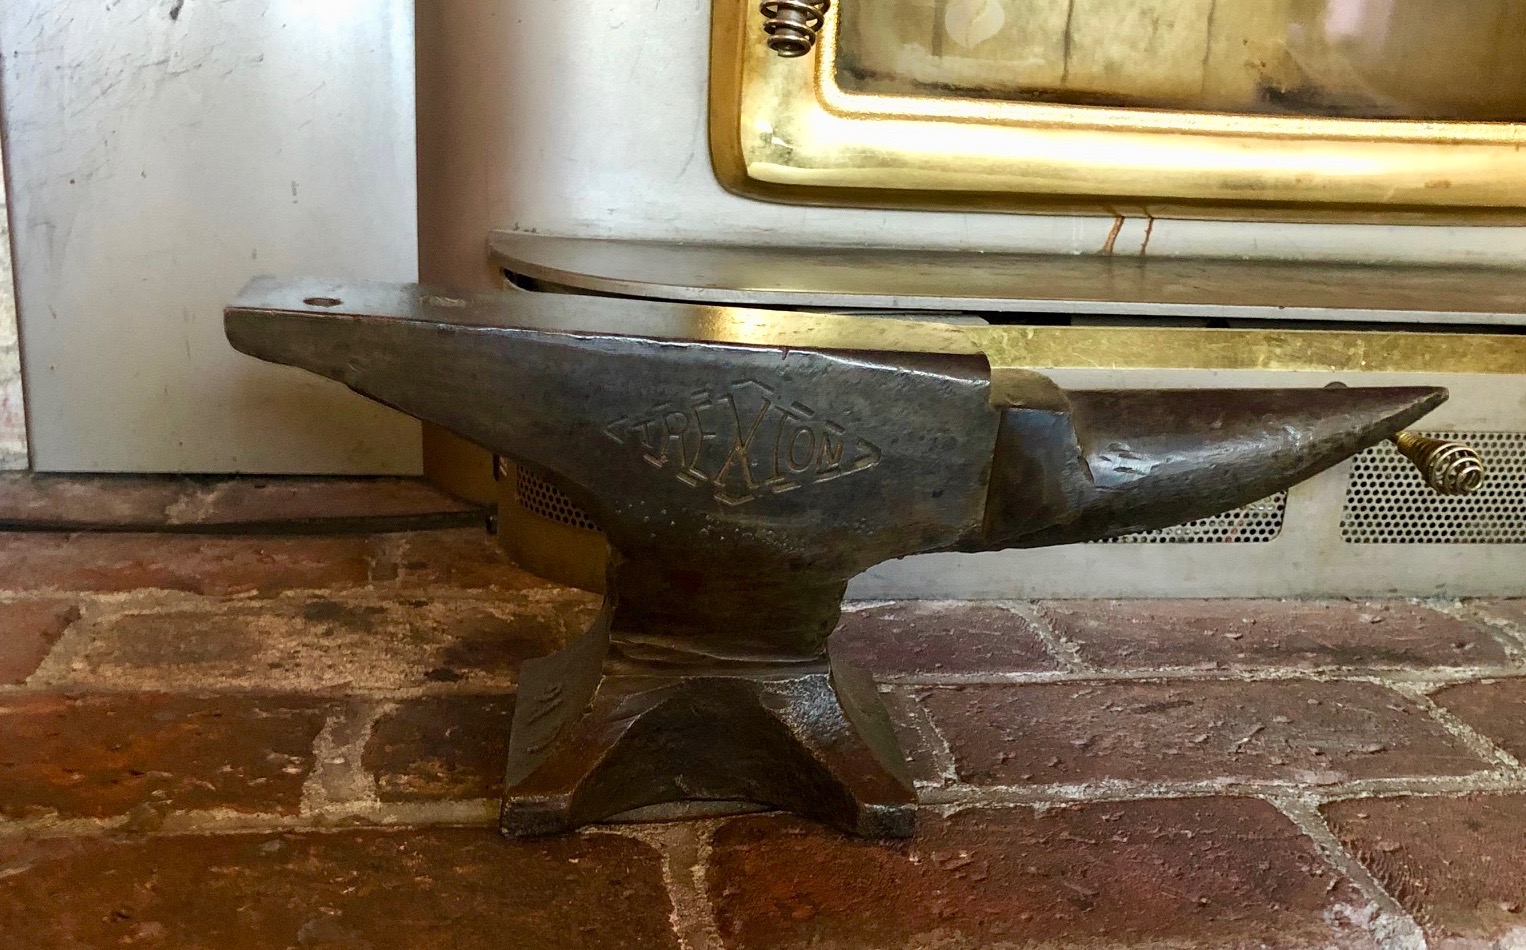
You may not know this about him, but The Man is an anvil fan with a small but select collection of early American anvils. Luckily he likes cute, little anvils. Like this one by our fireplace, which weighs 22 pounds.


His friend, Bill, is also an anvil collector, but he likes the two ton numbers. They're a bit more challenging to work into the decor.

This quilt started off as kind of a joke, but when you think about it, anvils aren't a bad subject for appliqué. They have strong, simple silhouettes and there's more variety in shape than you might imagine. The Man, of course, has what is THE book on American Anvils. More than 500 pages, all about anvils. I used the illustrations to trace my anvil patterns, so I can assure you that they are all anatomically correct.


This quilt is my second project based on the class, Cute Quilt-As-You-Go Applique Monsters, which you can find on Blueprint. My first rodeo with these techniques was with the Under the Sea quilt I made for my Granddaughter. The process is a bit down-and-dirty but it's also really fun and you can go from artistic vision to finished quilt lickety-split.

How about a few anvil close-ups? You know you want to...


Above is the classic one-horned anvil we all know and love. If you ask a kindergartner to draw an anvil, they'll probably come up with something like this.


This anvil is a bit different; it's a farrier's anvil. One horn, one drop and no table. Apparently farriers needed specialized tools to take care of those horse shoes.

Since we're talking about horns, here is a double-horned anvil.


This anvil doesn't have any horns at all. It's called a colonial or sawmakers anvil, and its job is to give a nice, flat surface for tensioning those saw blades.


Here we have an older style of anvil. It's called a bick iron. You could carry this one with you while traveling, then hammer the spiky part into a log and, voila! You could get to making horse shoes with a moment's notice


This is an arial view of the working surface of a single-horned anvil. That square hole on the blunt end is called a hardie hole and the round one is a pritchell. They're used for bending pieces of metal.


Here's an arial of The Man's Trenton anvil, so you can see the hardie and pritchell in real life.

If you've read this far, you now know more about anvils than 96% of your friends and family.

I used the left over fabric from this project to slap together the quilt back. I do like the idea of using my scraps but I keep forgetting that piecing the back is kind of like piecing a whole 'nother quilt.


I didn't have quite enough fabric to make the 6 inch wide outer border that I'd envisioned, so I did a double border with a mottled black. I had a heck of a time figuring out how to do a double border with quilt-as-you-go; my Blueprint class didn't cover that trick. While googling somewhat desperately I came across this tutorial, and it saved my bacon. Worked perfectly and was very easy to do.


Late fall tends to be heat wave season here on the Central Coast, so we probably won't be using this quilt for movie snuggling for another few months, but I'm sure it will come in handy once the days grow shorter and grayer.

Next up, a birthday dress for my granddaughter and then some more undies for me.

Wednesday, April 3, 2019

Under the Sea Quilt

I made an Under the Sea quilt for my granddaughter, pretty much on a whim. She's just about 6 months old now, and right at that stage where she wants to grab everything and put it in her mouth. I wanted to make her a quilt that had things going on; tentacles to boing, contractile arms to pet, and teeth to poke. I think they call them "activity quilts."

I made a sketch of the design some months ago, but I couldn't figure out a good way to get all those moving parts installed. Then I stumbled on a Bluprint class called "Cute Quilt-As-You-Go Applique Monsters," taught by Wendi Gratz, and all my questions were answered. Et voila!


Once I had some guidance on technique it was all pretty quick to do. Wendi Gratz has you quilt the individual squares, then use HeatnBond and a hot iron to fuse your little bits to the surface. Then you just stitch around the edges and Bob's your uncle. She says she's made quilts for her daughter that have been washed 300 times and everything holds together just fine. We shall see, because my granddaughter and her co-conspirator (her big brother) and sure to spill things on it daily.


Character #1 is a shark. There's a viral video called Baby Shark that both kids love; very catchy tune. So I had to include a shark. I used some little bobble trim for the teeth.


Character #2 is an octopus. Four of the arms swing free and they have minky on the back side, so they're kind of fun to finger. I tried to find something for the back that would be like suckers, but no dice.


Character #3 is a jellyfish. There's a narrow elastic in each of the tentacles, so you can pull them out and they boing back.


Character #4 was the last one I came up with. It was going to be a clown fish, but I couldn't find any good clown fish fabric. I did see some orange batik that I liked, so instead he's a Garibaldi fish. That's the California State marine fish, in case you're wondering. Normally he hides in the kelp, but you can take him out and boing him around on his elastic if you want to.


In the center there's a starfish that's stuffed with a little bit of batting to make her 3D.


This was a really fun project to do. The actual sewing only took a couple of days. I spent longer trying to get that danged elastic inside the jellyfish tentacles than on anything else. I ended up finishing and turning the fabric tubes and then threading the elastic through with a darning needle.


My granddaughter gave the quilt a workout during my visit last weekend. She went right for the tentacles, as I would have done myself.


Plus, she figured out how to get the Garibaldi fish out of the kelp in mere moments. I think she is a genius.

I was a happy Craftsy user for quite some time. I tried to resist buying a Bluprint subscription for months. I worry that it's going to become just another streaming TV station and go over to the advertising dark side. They finally offered me such a good rate that I buckled and joined for a year. And it's been good so far. I've watched classes that I probably wouldn't have purchased under the old Craftsy model and I've enjoyed some of them very much.

This class is one of those serendipitous finds. If you have any kids in your life who might enjoy a tactile quilt, I recommend it!

Actually, this style of quilt would be fun to do for an adult if you use less childish imagery. My friend Martha and I were saying I should make an anvil quilt for The Man. He's heavy into anvils at the moment, and they have distinctive silhouettes that would lent themselves to this sort of thing. Hmmm.