Showing posts with label Grainline archer. Show all posts

Thursday, January 28, 2016

Still in Time for Winter

I've been wanting a plaid flannel Archer ever since I made my first Archer almost two years ago. What took me so long?


Partly it was hunting for the right fabric. Most of the flannel in the world looks to be intended for pajamas for tiny tots. I had a heck of a time finding something that didn't involve yellow duckies or mermaids or Jedi.

I finally found this fabric in Irvine while visiting my son last year. He very sweetly took me to his local Jo Anne's and patiently waited while I selected a couple of pieces of flannel and then stood in a ginormous line to have them cut. Twenty-five years ago he would have gotten a Teenage Mutant Ninja Turtle out of the deal. Poor kid, this time all he got was a grateful mother's thanks.

This isn't the best quality flannel, but it is dense and warm as toast.


It took me another year to move from inspiration to finished product because: plaid. I got some extra fabric because I knew I'd have to figure out some pattern matching. I think I got three yards and it was just about enough.
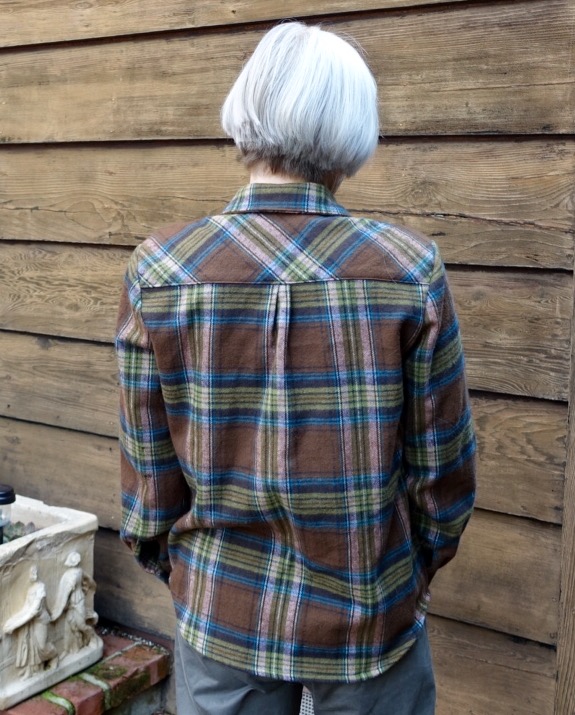

I don't think it ended up too bad. I did the button band, cuffs and back yoke on the bias to save myself some headaches. I kind of knew I should cut the thing out in a single layer to make sure my plaid would line up just right, but I couldn't make myself do it. Sure enough, it was the pieces cut on the fold that screwed me over. They were off by just a squidge, but it was enough to make my eye twitch. I did end up recutting the collar in a single layer so that the pattern matching right by my face was more even.

Not the pleat the pattern asked for, but needs must when the devil drives
And I fudged the back by taking two little knife pleats rather than the box pleat the pattern asks for. I hope that makes it a little less obvious that that central line of plaid isn't really quite central after all.

Cuff detail

The only modification I made from Archer #1 was to shorten the sleeves one inch. Now they feel juuust right. I used the angled cuffs again. I think that's such a cute feature.

Practice must really make perfect because I didn't have many issues sewing the shirt up this time around. I did have to re-cut the upper collar. And I did fuse the interfacing to my press cloth rather than the pattern pieces. Twice. And I'm still not sure I understand how to work that bias band on the sleeve slit, but my fabric was so beefy I had trouble jamming the things under the presser foot so maybe I couldn't have done much better. I was really worried about my machine being able to punch through all those layers to put in the button holes, but my Babylock came through like a champ.


So glad I got this made up while we're still slogging through our damp and chilly El Nino winter. Though here in California, all rain is good rain and we'll take what we can get.

My pattern review is on PatterReview.com here.

Tuesday, April 29, 2014

Archer Hits the Bullseye

Just under the wire, here's my MAGM offering for April; the Archer Button Up Shirt by Grainline Studio. The pattern comes as a PDF, which you tape together and then trace. The actual pattern pieces run to 36 pages, but slapping them together really went pretty quickly, and all the little markers lined up very nicely.

Being the brick that I am, I traced a size 6 up top and graded down to a size 2 in the hips.

This is the most precise garment I've ever tried sewing. It's a real shirt, with a collar stand and cuffs and a button band and everything.

What they say is true though: this pattern is very nicely drafted and the instructions, plus sew-along, were so detailed and logical that I feel like I did a pretty good job!

Front view, worn here with a pair of Clovers from pre-blog days
You know how you notice things in photos that you don't see when you look in the mirror? The sleeves look too long here, but they feel good in real life. In any case, I usually wear my sleeves stylishly rolled up when I'm out and about.

Side view
I really like the fit everywhere else though. It's slim enough not to look sloppy but generous enough to look casual, maybe even a bit raffish. The perfect boyfriend shirt.

Back view
I used a cotton shirting (Italian!) that I got at Stone Mountain & Daughter while on a recent weekend in the Bay Area with The Man and his brother. Brother was sweet as pie. He accompanied me to the store and gave me advice on fabric weight and color. He was a lawyer in Chicago before he retired and is still quite the snappy dresser. He knows what a good button-up shirt should be made of.

Dang, should have clipped those threads more carefully before the photo session...
The fabric is a muddy green, with a very subtle navy blue stripe. I tried to pull out the navy by using some dark blue buttons. It has a somewhat crisp hand and a close weave that probably makes it super durable. I can also tell you it has no ease whatsoever. Thankfully, the pattern has you sew in the sleeves flat before seaming up the sides, and there's very little ease in the sleeve cap, so even this sturdy, professional-grade shirting worked out just fine.

My attempt at a Burdastyle model pose. Notice how you can't see the shirt much at all?
I'll probably wear it more as a light jacket than as a shirt. In my old age I'm trying to be more conscious of how much sun I'm getting. Kind of like closing the barn door after the horse has bolted, but what can you do? In my youth, tanning was all the rage. Anyway, a light, loose layer with a collar and long sleeves should be just the ticket for summer sun protection.

I also bought a length of shirting in black with a very subtle lavender stripe. It's destined for the version with the back ruffle. Or maybe that would be better in something with more drape? Some stash-diving may be in order!

My pattern review is here on PatternReview.com