Friday, October 13, 2023

Stretch and Sew Trousers

I really like the old Stretch and Sew patterns. According to the pattern envelope, this one is from 1988. The tee shirt with short sleeves is my hands-down favorite tee pattern. Two pattern pieces, and you just turn and zig-zag the neck, sleeves and hem to finish. I just realized that I've never tried the long sleeve version. Must do that this winter.

The pattern includes a pair of knit trousers. The style kind of reminds me of my youth. Well, if it was the 80's it wasn't really my youth; more like my 30's. I remember wearing that style pretty often, back in the day. So I decided to give these trousers a try.

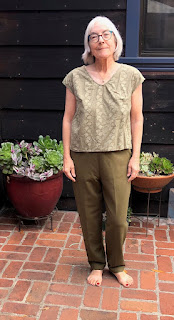
They're high-waisted and narrow toward the bottom, and they have nice, roomy slash pockets.

I used a ponte knit, which is probably a little too heavy for the style. I want to give them another try in something lighter, because they sure are comfortable and I really like those pockets. 

The ponte will feel nice and warm once winter comes though. 

They're basically sweat pants, but a little sleeker, I think. 

The pockets are put together in a way I'd never seen before, and I really like it. It made the process very intuitive. 

There's just one pattern piece for each pocket. 

You cut it out and seam to the front of the pant, like usual. But then you flip to the inside and just fold the pattern piece to match the side seam and a couple of notches. And voila, you have a pocket! 


If I'm ever wanting to alter a pant pattern to add a slash pocket, I'm going to try doing it this way.

My pattern review is on PatternReview.com here.


Nosara Take Two

 I knew I was going to be wanting another Nosara or two as soon as I got my first one done. 

This version is in a cotton faille from the Fabricsstore.com, in a print called Jacobean Jewelry Blue. They've started carrying cotton prints fairly recently and I've been interested. I'm generally not a flowery-print girl, but this one I decided I liked. The colors are nice and the print is large, so it feels more restrained than some. 

Anyway, they sent me a seductive email with sale pricing that I opened at 5:00 am. My resistance was low, so I ordered a yard to experiment with. Why didn't I get a yard and a half? Because I'm cheap like that. Luckily the fabric is 59 inches wide, so I had some room to finagle.

I had to do some sweating and struggling, but I managed to fit the pattern pieces for the Nosara on that one yard. I was just about ready to admit I'd have to cut the inner yoke out of some random remnant, but I flipped things around one last time and bingo!

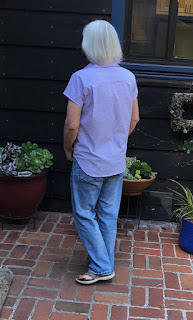
I like the cut of this shirt a lot. The collar is nice, the bust dart helps those cut-on sleeves follow the body and the slightly lower hem in the back covers the butt nicely.


There's one thing I didn't think through before cutting though. This shirt has a collar stand and button band, like a men's shirt, rather than a collar with facing, like a camp shirt. That means that if your fabric has a clear wrong side (like mine does), it will show a bit at the top of the neckline. I'm letting go of my angst about it though.

My pattern review is on PatternReview.com here.


Yet Another Archer Shirt

This is at least my 5th Archer. I made my first one back in 2014 and I still wear it often. That Italian cotton shirting wears like iron. 

Anyway, over the years I managed to lose my original pattern. I have the pieces I traced 10 years ago and I've managed to stumble through the construction by clinging to the sew-along on YouTube. This time I had some basic questions that I didn't want to have to hunt around to answer. Like what is the seam allowance? 

So, even though I'm a cheapskate I decided to buy another copy of the pattern, and I'm glad I did. I've gotten so much use from this pattern that the designer deserves another 20 bucks from me. Plus, Grainline has updated some of the pattern pieces and construction methods. And by post-stalking myself I realized that back in 2014 I blended three sizes when tracing. I went from a 6 at the bust to a 2 at the hips. No wonder my Archers feel a tad snug over the butt these days. I think I'll bite the bullet and do a new tracing when I hop on Version 6.

This time around I used a blue and gray plaid that I got from Cali Fabrics for something like $6 a yard. At that price, even I was willing to pop for two yards. The fabric was something like 60 inches wide. I felt like I had oceans of yardage. I could easily put the cuffs, outer yoke and button band on the bias, and I could even try to match the plaid at the side seams. 

Yeah, it seemed like oceans of fabric until I realized I cut the right front pattern piece off-kilter and it was going to be obvious enough to make my eyelid twitch. So I recut that. Oh, and I messed up the cuffs, so they were cut twice. It went on like that, but I'm pretty happy with how it turned out in the end. 

The fabric is 100% cotton and it was stable enough to fray very little (I'm looking at you, handkerchief weight linen). It's also pretty light weight, so the areas where the layers stack up weren't too hard to handle. Unlike like my corduroy version. Or my flannel version.

Version 6 goes great with jeans and it complements many of my skirts and shorts. I'm glad I added it to the stable.

My pattern review is on PatternReview.com here.
Tuesday, September 26, 2023

Bryer Skirt by Liz Haywood

I first saw this skirt on Fadanista's blog, and I really liked it. Her version is made from a lovely corduroy and it looks like it would be perfect for striding across the moors in sturdy boots and a warm shawl. I didn't have any corduroy, and here on the Central Coast we are lacking in moors. But I did have a hunk of inky blue linen so I decided to go for it.


This is the Bryer skirt, from Liz Haywood. She's a zero waste designer who lives in South Australia. I've been intrigued by the idea of zero waste but many of the garments produced just don't ring my bell. I really liked the looks of this skirt though. The darts at the hem give it an interesting shape, and I liked the idea of a couple of big pockets sandwiched in the closures. 


The process felt like an adventure. I must have shifted my pattern pieces around for 20 minutes before something clicked. Here's the layout I ended up with. The front and back of the skirt are identical, and the rectangular-ish pieces in the corners are the pockets. Looks like I had juuust the right amount of fabric, doesn't it?

Actually, I had a small hunk left, which I needed for the waistband. So I guess my particular skirt isn't really zero waste, but I came pretty close.

I went for the long version because of the whole moor-striding fantasy, and I like it. We're still in flip-flop weather but once winter comes I think it will look nice with a pair of boots and maybe a chunky cropped sweater up top.

There are 8 darts around the hem of the skirt which gives it a rectangular vibe, kind of like one of those tablecloth skirts. I wish I were cool enough to post a video, because it looks nice as you move in it. 

The construction was very straightforward, except for inserting those pockets into the closures at the waist. I got it done but I'm not convinced I got it done correctly. They are, indeed, nice and big though.

My linen is a bit sheer in the light, so I should probably wear a slip with this. I'll try to think of it as a petticoat (see moor-striding fantasy above). 

My pattern review is on PatternReview.com here.


Friday, September 15, 2023

Toaster Sweater

We've had an unusually chilly, foggy spring and summer here on the Central Coast and my small stable of sweatshirts has been getting a real workout. I was out on a sewing shopping spree with my friend Jessica and I decided to finally pop for the Toaster Sweater pattern by Sew House Seven. Kind of wish I'd picked it up earlier because I like it a lot.

I opted to make sweater number 1, which has a sort of a funnel neck and a slimmer cut than sweater number 2. 

Super simple to put together. It has raglan sleeves, and the bands at cuff and waist are nice and wide and easy to attach. The collar was a snap too, but beware, it takes a sizable chunk of fabric.

I used a cotton sweatshirt fleece from knitfabric.com in a color they call pickle. Which is pretty much what it looks like. I always keep an eye peeled for sweatshirt fleece while fabric shopping, but it's surprisingly hard to track down. This site has quite a few, in nice colors and even some cute prints. 

If the weather keeps up this way I could do with another of these. I'd like to have seven sweatshirts, one for each day of the week. Now that I've found a fabric source I can make that happen.

We usually get a spell of Indian summer heat at the end of September, but so far it's not on the horizon. Maybe it's El Niño?

My pattern review is on PatternReview.com here.


Tuesday, August 29, 2023

Itch to Stitch Nosara Shirt

We're entering the dog days of summer here on the Central Coast. For us that means daytime temps in the 80s and evenings in the high 50s, which is nothing to you hardy folks from the mid-West. But we are delicate flowers, so I've been mining my collection of cool, loose cotton tops.

My newest contender is the Nosara Shirt by Itch to Stitch, made up here in a light cotton seersucker in a white/purple stripe from Cali Fabrics.

From the Itch to Stitch website, the Nosara features:

  • Options for cup sizes
  • Standard collar with collar stand
  • Integrated dolman sleeves
  • Front buttoned
  • Back yoke with back pleats
  • High-low shirttail hem
  • Designed for non-stretch, lightweight woven fabric

I opted to trace out a size 4 in a B cup. I thought about doing the size 6, but I checked the finished garment measurements and figured the ease in a size 4 would suit me just fine. And I think that was right, though a size up would be nice too. The extra air-flow might be just the ticket on those hotter days.

The construction of this top is nice and straightforward, and the instructions are great. Somehow I don't have many tops with the high-low hem thing going on, and I like it. This one's not too extreme, just enough to discreetly cover the butt.

You can't tell from the photos, but I cut the back yoke with the seersucker stripes going horizontally to emphasize that design element. 

Overall, a fun and stress-free sew with a very wearable result. 

I'd be happy to have another of these in my closet, and I have 2 yards of a grey and periwinkle checked shirting that's just asking to be cut out. 

My pattern review is on PatternReview.com here.

Thursday, August 10, 2023

Leaf Blankets

My grandchildren are going to be gaining two new cousins in October. Their Uncle Benny is going to be having a baby boy, and their Aunt Charlene is going to be having a baby girl. Neither sibling knew the other was expecting until they both made announcements at Charlene's 40th birthday party. It was a riotous celebration, for sure.

I was poking around for ideas for baby shower presents when another sewist turned me on to the Leaf Blanket patterns at Twig and Tale. Could there be anything cuter than a little baby having tummy time on top of an enormous quilted leaf? I don't think so.

I popped for the Tropical Leaf Bundle, which gave me patterns for six tropical leaves in sizes ranging from mug rug to 46 inches long. I decided to trace out a size Small for each pending bundle of joy. I made the Elephant Ear for Baby Boy and the Lily Pad for Baby Girl.

The Elephant Ear in size Small is 35 inches long. Roomy enough for a baby to lounge on comfortably.


The pattern includes leaf veins that you can quilt.

I decided to make one side of my leaves in a vaguely organic color and to use a cute kid print for the underside.


That way when Baby Boy has graduated to tummy time he can enjoy looking at a bunch of cute animals doing yoga.


The size Small Lily Pad is 33 inches in diameter. Baby Girl can pretend she's drifting down the Nile.

And if she gets tired of green, she has a flotilla of jellyfish on the flip side to keep her entertained.

Or she can lie sideways and pretend she's atop a polka dotted pac man.

These little blankets were very satisfying and straightforward to make. Not to mention quick; I probably had both of them done in 3 or 4 hours. Might have been even quicker if I hadn't had to take a few recesses for other tasks.

Twig and Tale has leaf pattern bundles for a variety of ecological zones. If you're more of a Maple person, there's a North American bundle for you, and they've got Australia, New Zealand and Europe covered too.

If you have any kids in your life, or if you just want a set of cute placemats or coasters, this pattern is great.

My pattern review is on PatternReview.com here.


Twig and Tale Fairy Wings

 My great niece is turning 3 next Sunday. I made her a shark puppet for Christmas last year, which was reportedly a hit, so I thought I'd try for another hand made toy.

These are the Woodland Sprite Wings from Twig and Tale. In this first picture they're perched on a lily pad baby blanket.

Here they are held up by moi, so you can get a sense of the size. I made the Small, which is intended for kids aged 1 - 3. When I don't have the kid right in front of me I find I can no longer judge how big a 3-year old is, but I think this will work for Jeanne for a little while anyway.

Here's a close-up of the public side. The wings are stiffened with some heavy-duty interfacing on both front and back and also some sew-in interfacing on the front. They feel pretty sturdy. I'm not a pro at working with those types of materials, but the instructions were good so I was able to muscle my way through.

The appliqués can be cut from little scraps of whatever you like. I used a fuse-able adhesive to position them and then zig-zagged around the edges to hold them on permanently (I hope). 


Here's the underside. The kid is meant to slide their arms through the elastic straps and then flit about the house like a sprite. The stiffened line down the middle, which the designer calls a spine, is supposed to keep the wings at attention, and also give them a little bit of movement. I haven't seen them on an actual kid but I'm pretty convinced they'll operate as intended. 

My great niece is a cute little nubbins who dances around like a fairy even without any wings. I'm hoping she'll get a kick out of these.

My pattern review is on PatternReview.com here.


Sunday, July 16, 2023

Yet Another Diva Bag

This is the bag that I've used exclusively for decades. I got the pattern at the Pajaro Valley Quilt Show many years ago. I love it. I think it's what one would call a "bucket bag." It sort of folds in half so you can sling the straps over your shoulder. When you unfold it, it unzips to reveal a cavernous interior. It easily holds the many, many items I seem to need to carry with me everywhere, and there's room to add a bottle of water, a sandwich, The Man's glasses and probably also a watermelon. 


There is a small pocket between the straps on side #1. It's just the right size to hold my phone so I don't have to dig around to answer it when on the prowl. It could also hold a bottle of water, or a baby bottle. I think this pattern was originally designed as a diaper bag.

There's a larger pocket on side #2. I keep my keys in there. Always. That way I'm not one of those people who keep asking their spouse, "Honey, did you see what I did with my keys?" 

This is probably at least my 8th iteration of this pattern. I've made it from bark cloth, quilting cotton and remnants of upholstery. This version is upholstery fabric, bought for $2 a yard at Crossroads Fabrics in Watsonville (sadly closed now). 

I've had mixed results with upholstery. Some varieties look strong but the surface starts to pill or shred surprisingly quickly. Which makes me glad I didn't choose 30 yards to recover my living room set. This one was a little hefty to manipulate but it feels like it will last.

Here it is unfolded but still zipped up. One thing I love about this pattern is that you can put one strap over each shoulder and wear it like a backpack. Sometimes it's nice to be able to redistribute the weight when you've been out and about for the day.

And here it is unzipped. Tons of room in there, and the opening is nice and big so it's easy to find what I'm looking for. I usually add a few inner pockets too, for stashing a tin of mints or my cowgirl mirror. 

I used an on-sale quilting cotton for the lining. I read somewhere that it's good to use a light-colored fabric to line a purse. It might get dirty-looking sooner but it makes it easier to see what you have in there.

My last version was made from barkcloth and it lasted for almost 5 years. I interfaced the outer fabric, which probably helped. No interfacing in my new version, which saved me some cutting time. 

RIP old friend

My pattern review is on PatternReview.com here. And you can get the pattern from the designer, Lynndi Enright, at The Stars Aligned Studio.